How to Clone a Campsite - Tutorial
How to Clone a Campsite - Tutorial
We will start by selecting a previously cloned Campsite for a Florida school (In this example we will be using FTCE GK Math FL-EFSC)
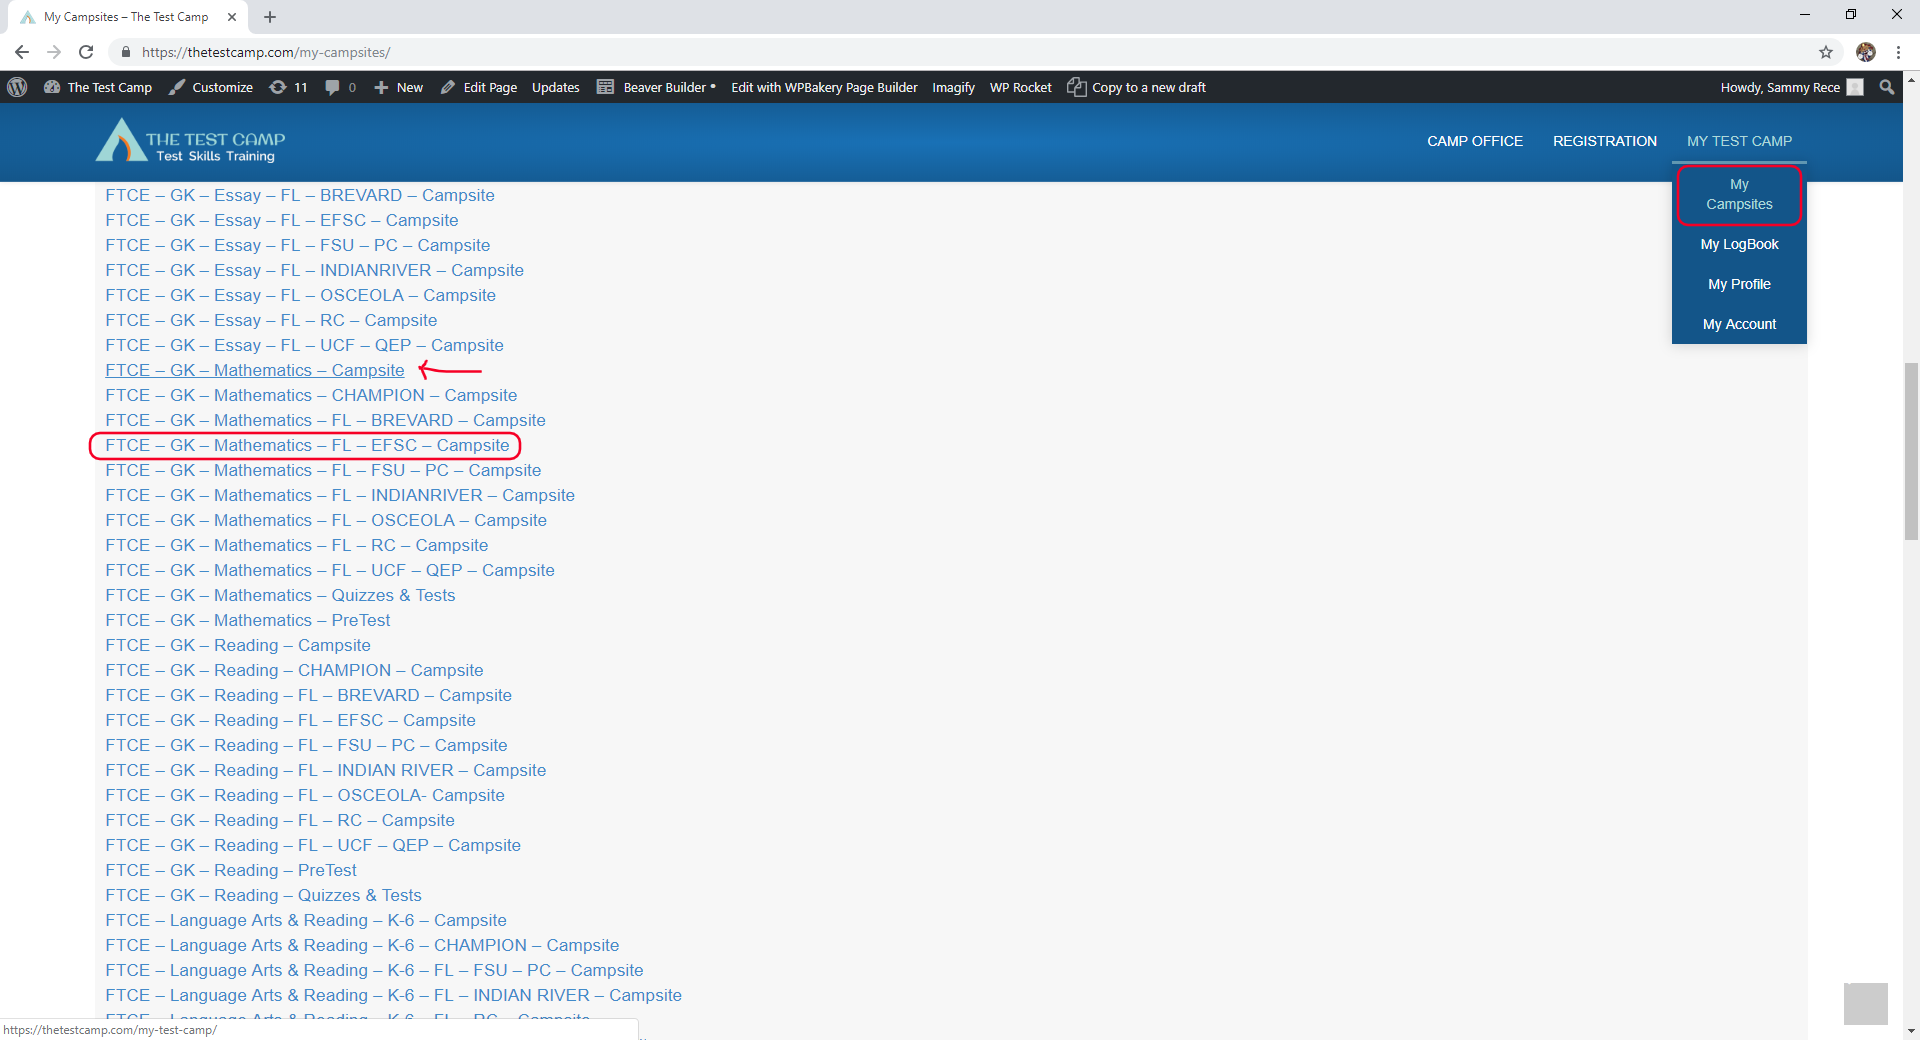
- Go to the My Campsites page https://thetestcamp.com/my-campsites/
- Look for the Campsite titled "FTCE – GK – Mathematics – FL – EFSC – Campsite".
- Open this Campsite to its Home Page by clicking on the link of the Campsite
Note: The previously cloned Campsites for Schools should always be listed under the main Campsite it was cloned from (see red arrow in screenshot below)
SECTION 1: Pre-setup
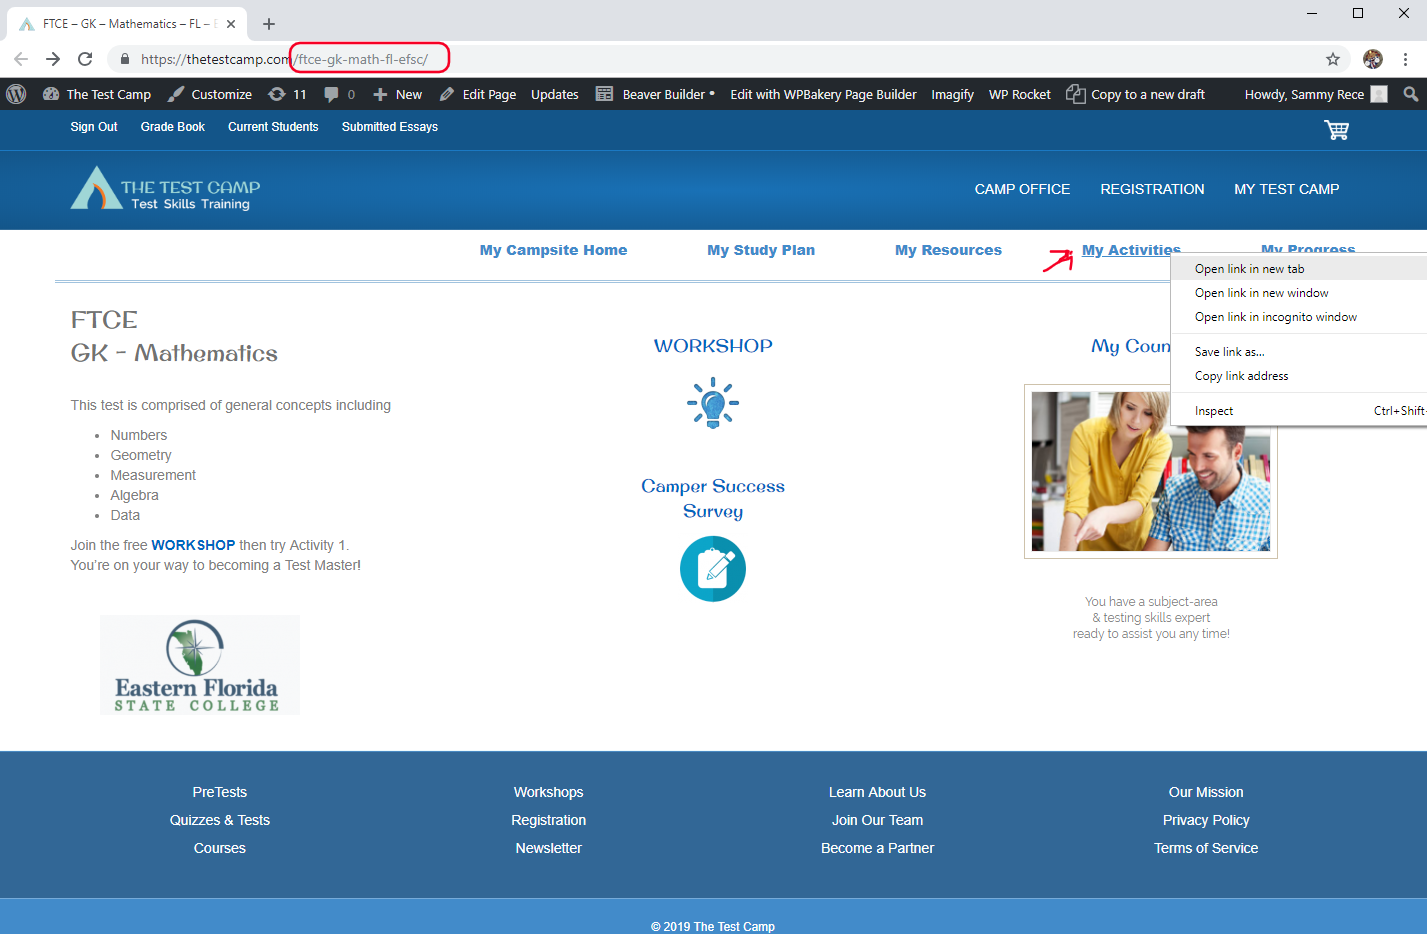
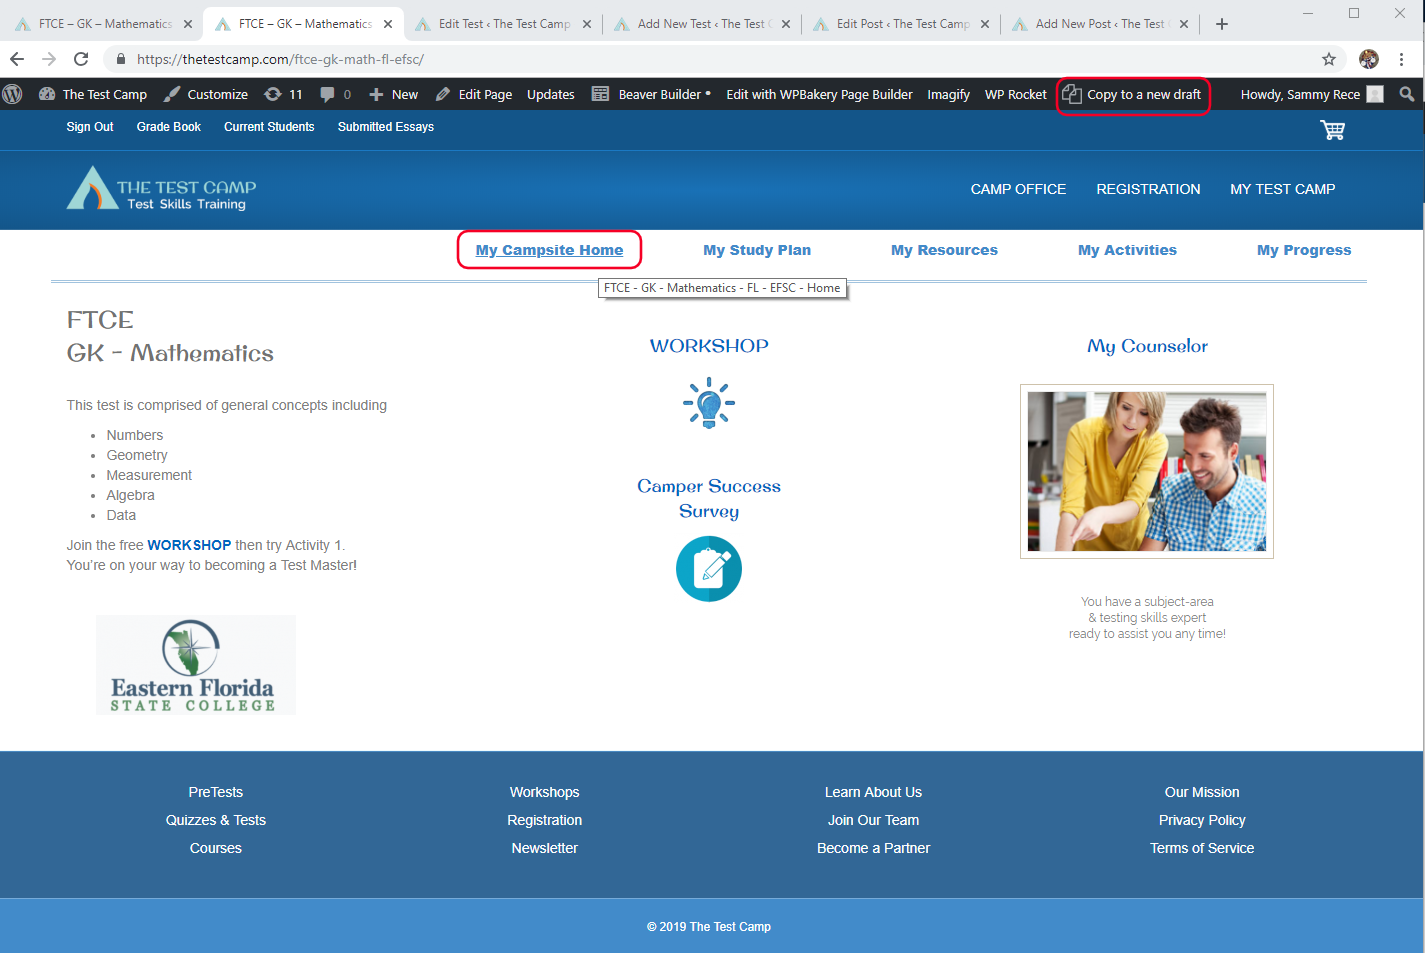
Now you be on the cloned campsite's "Homepage" (in this example we are going to clone from EFSC.)
- First make note of the path naming convention in this case "/ftce-gk-math-fl-efsc"
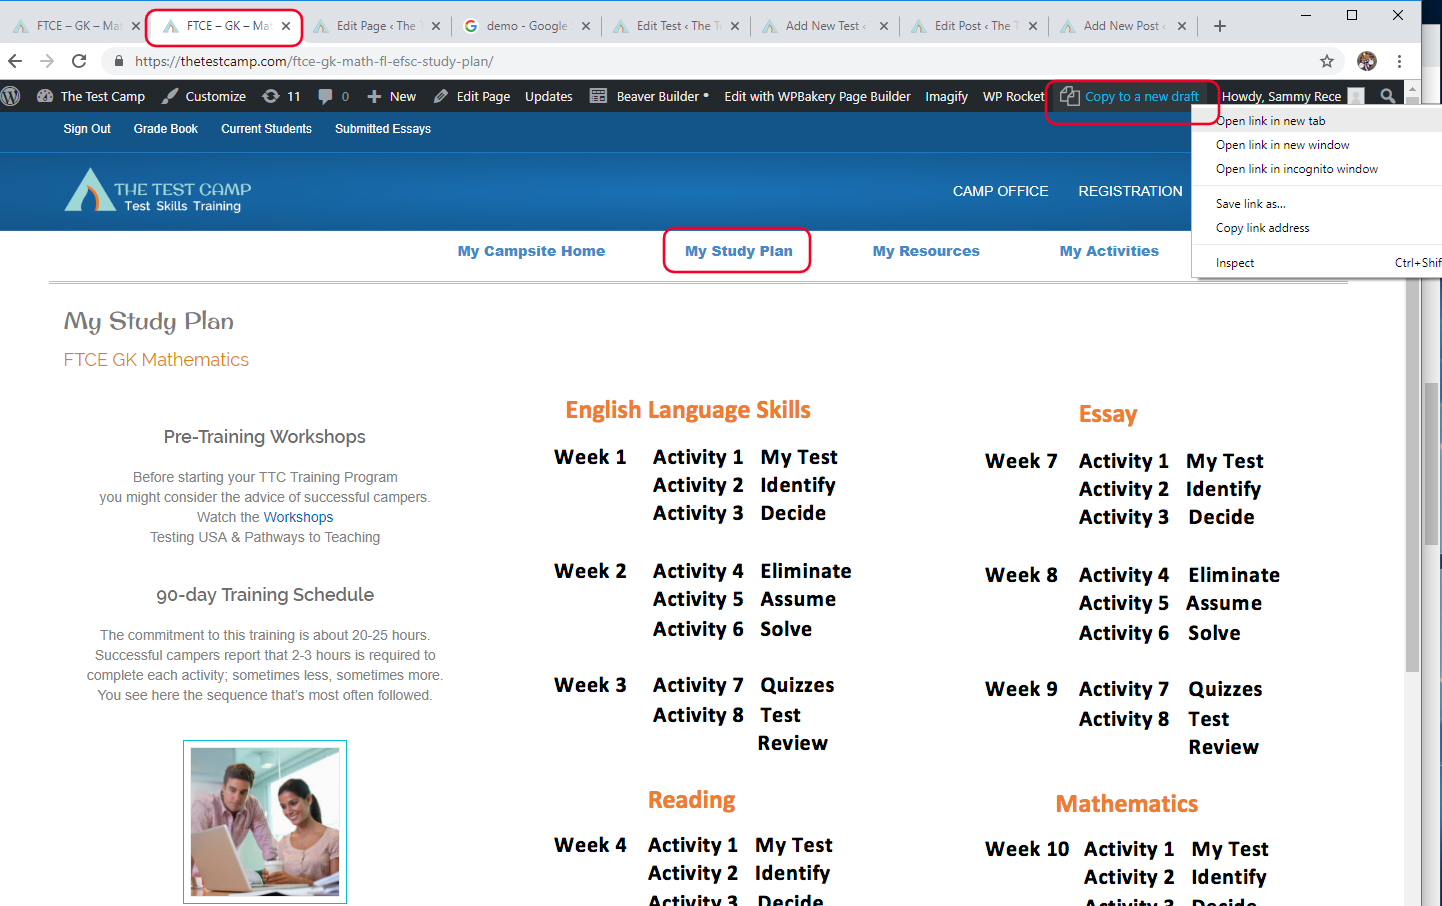
- Look for the blue features menu link titled "My Activities" (found below the websites main menu)
- Right click (or on a Mac do a "CTRL" key and Mouse tap) on the "My Activities" link and select "Open link in new tab"
- This will open a new browser tab to the "My Activities" page.
Note: There is a reason why you will need to open these pages in tabs while you are cloning.
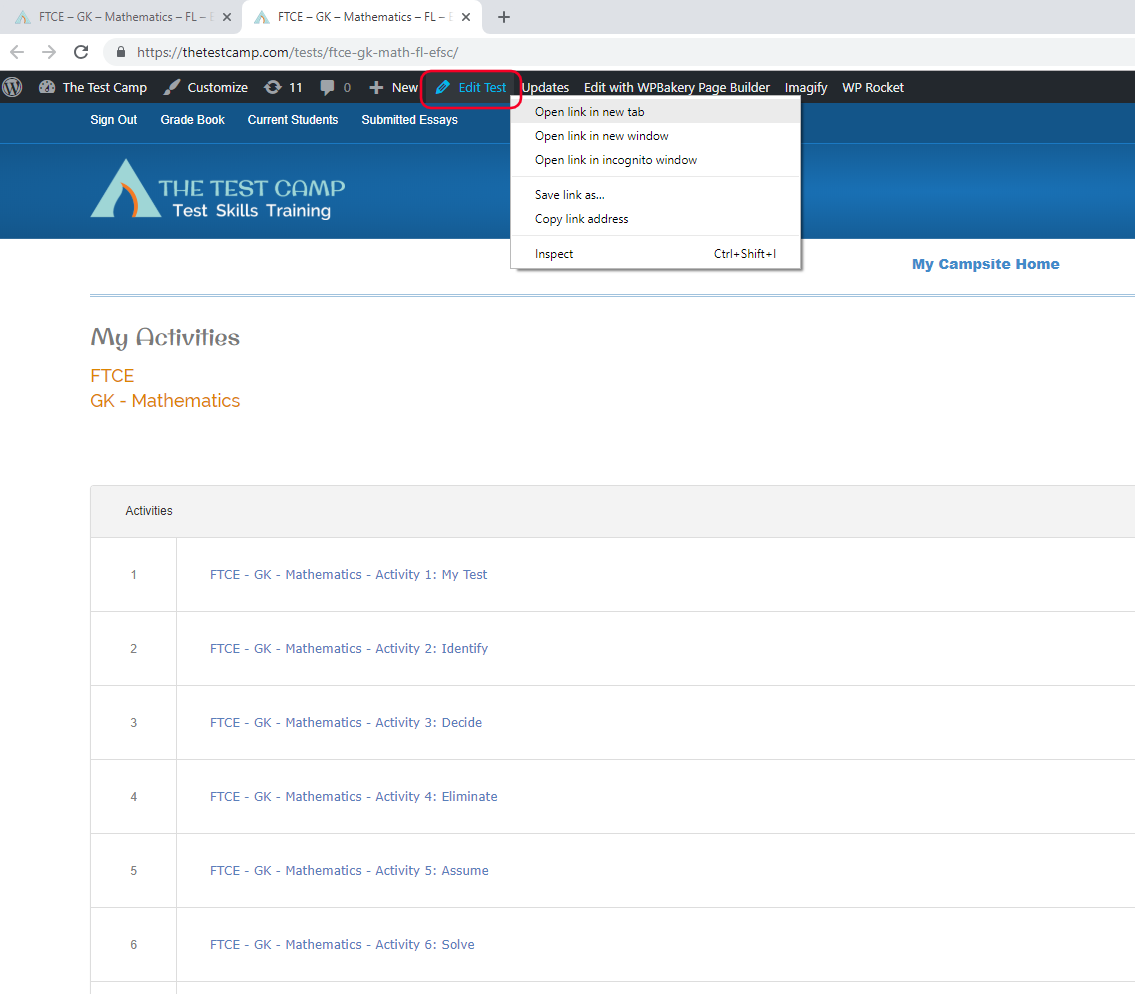
From the "My Activities" page (this page is also the "test" level that contains all activities and exercises)
- You want to leave this page up and open the "Edit" Test page in a new tab from the link found on the admin toolbar at very top of page (see screenshot below).
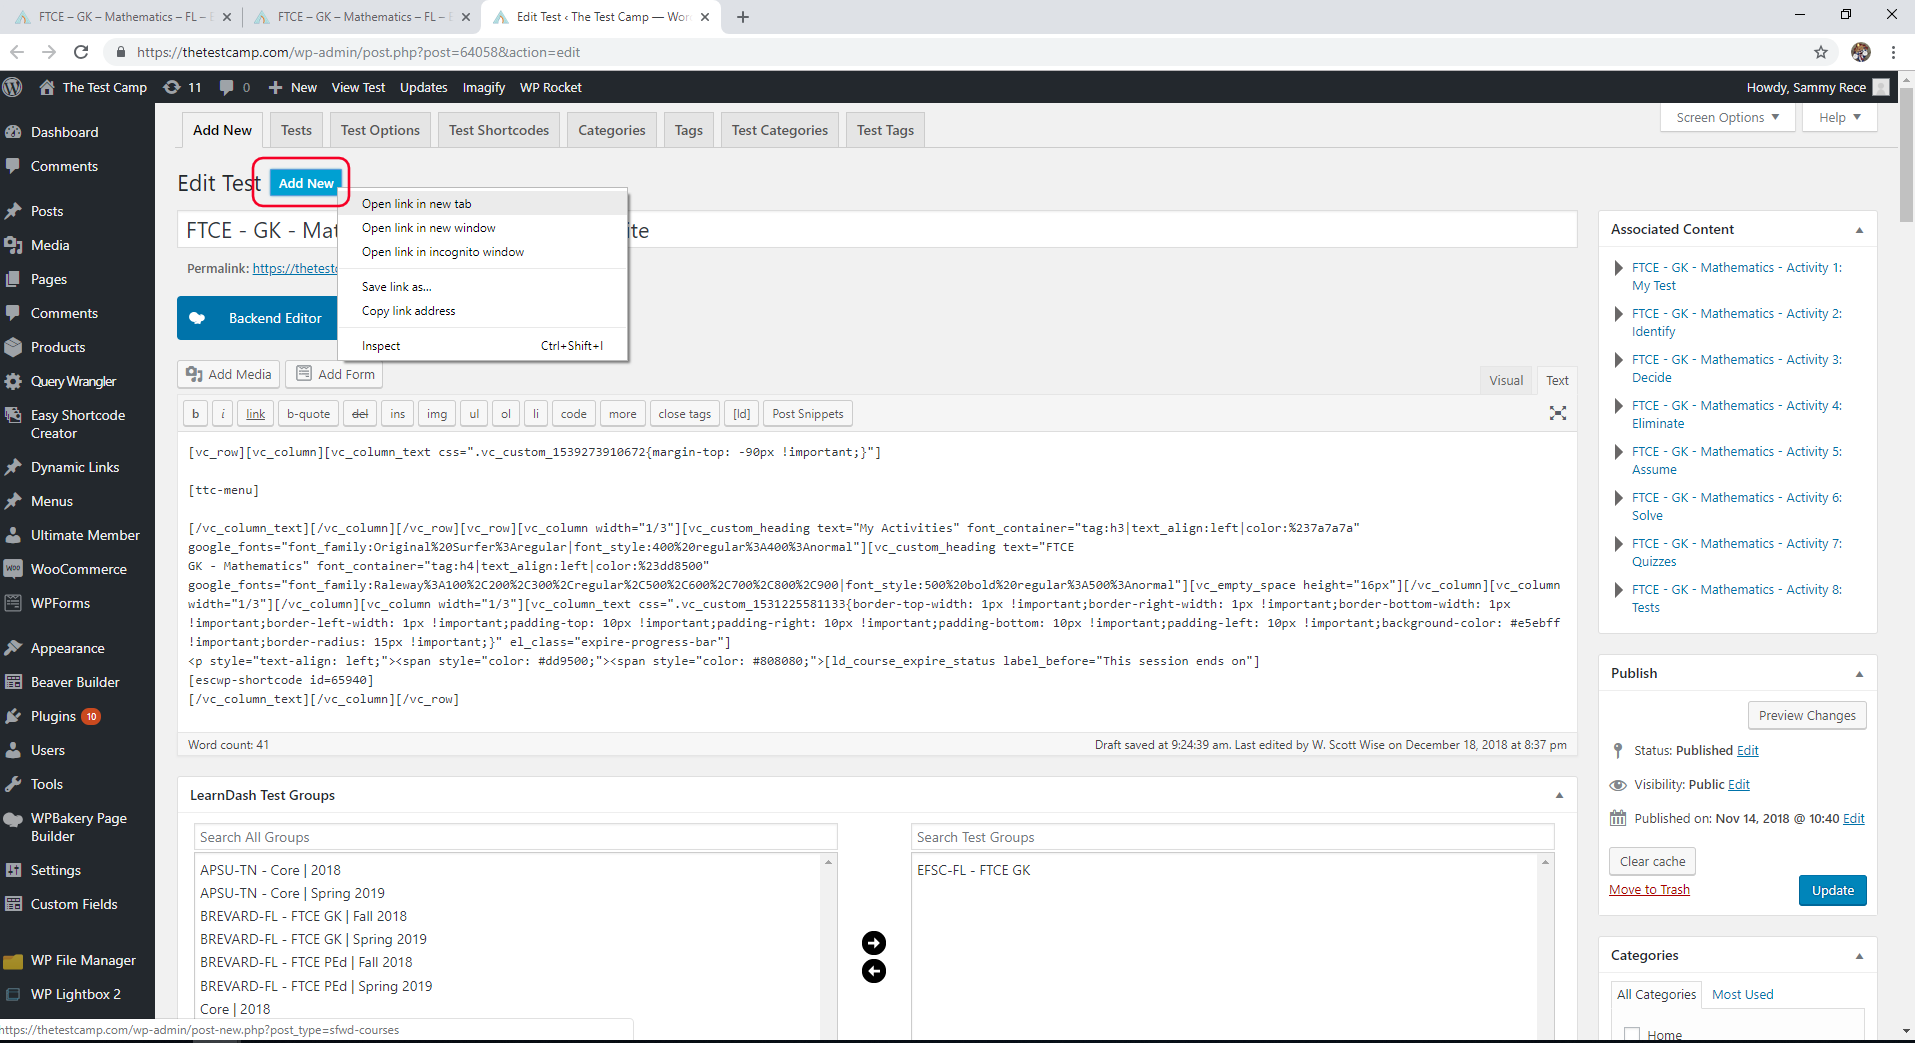
Now you be on the Test edit page for the FTCE GK Math - EFSC - Campsite:
- First copy the title (to be pasted into the new blank test title)
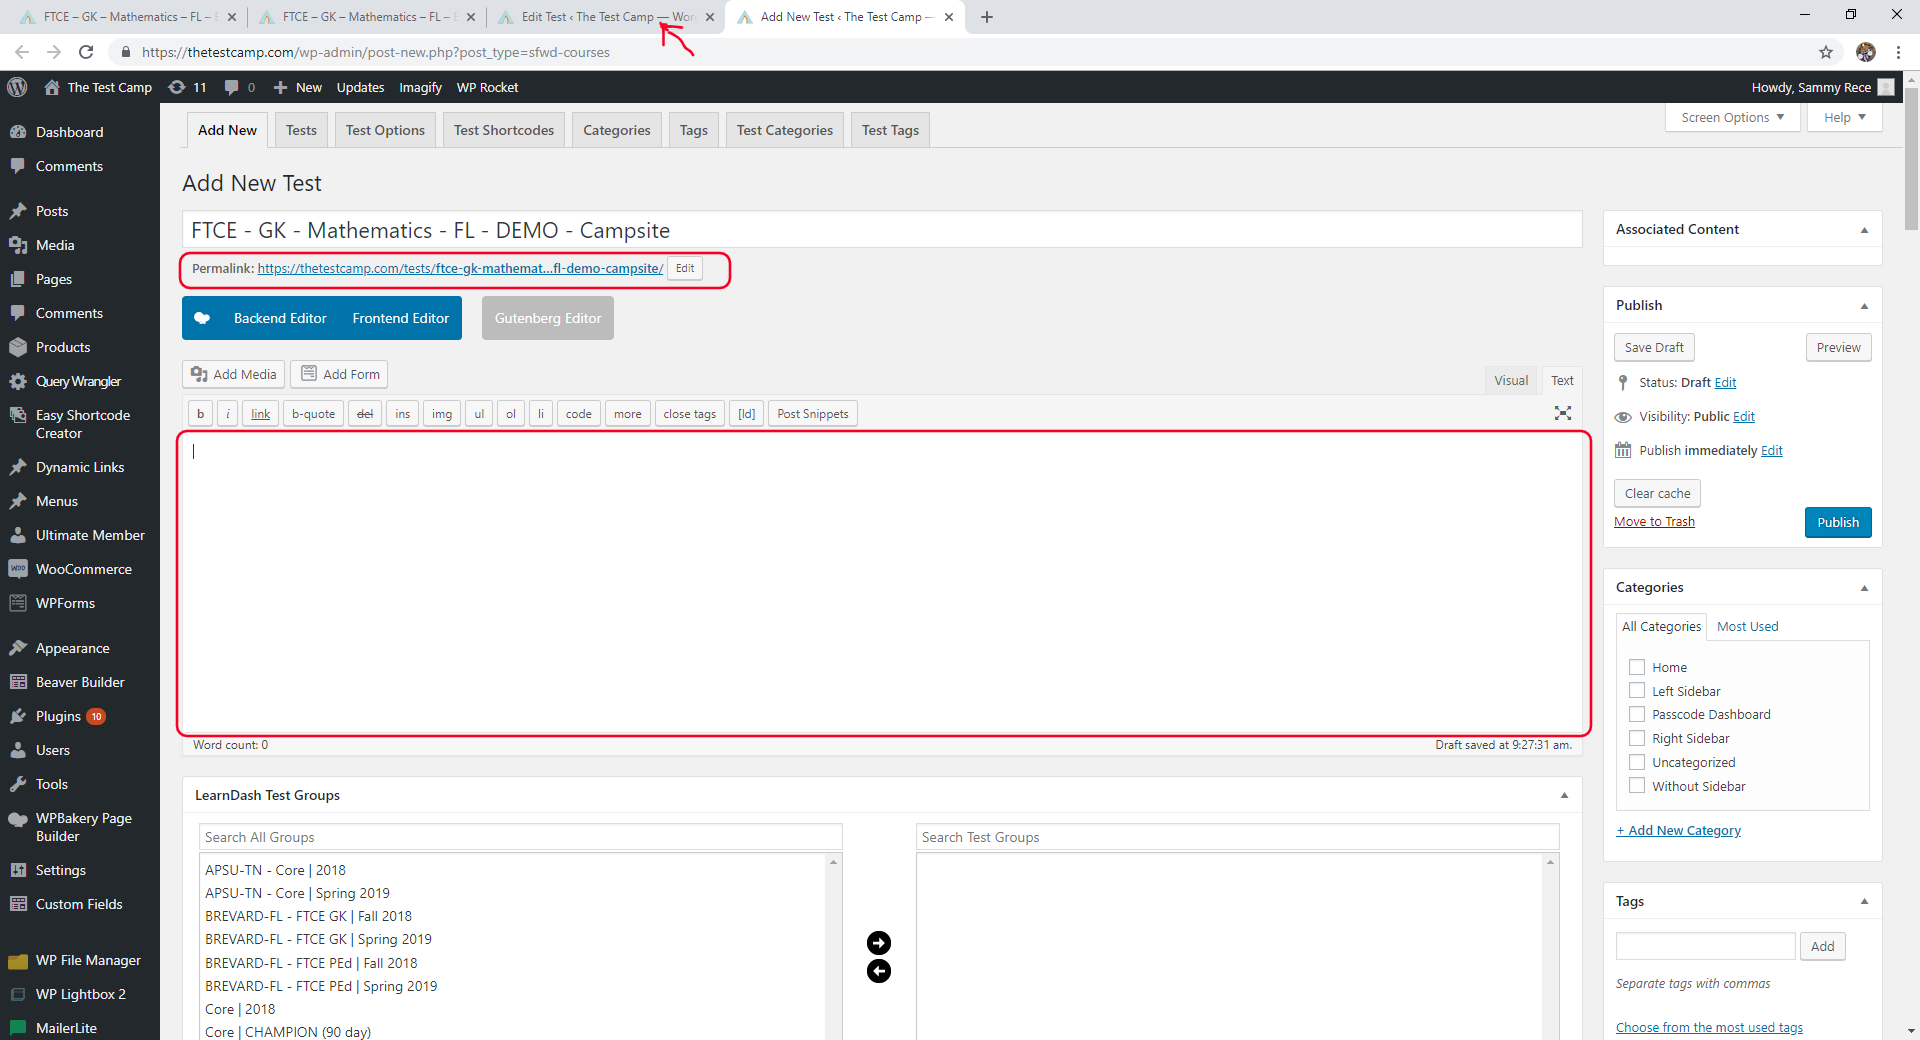
- Keeping this page open just open a New (blank) test in a new browser tab by right clicking from the blue "Add New" button.
Go to the browser tab with the new blank "Test" edit page:
- Paste the title from the EFSC test into the blank title and just simply replace the EFSC with name of the school you will be make the Campsite for (in this case we are just using "DEMO").
- Notice the permalink (url slug) is not correct according the EFSC test (Go back to EFSC test edit page to copy url slug)
- Also, there isn't anything in the description yet so you will have to click back over to the EFSC test edit page to copy that info (found on your previously opened browser tab).
Note: Do not publish the test just yet until all settings have been applied could auto add to all students already registered if test left to "Open".
Back on the EFSC Test edit page:
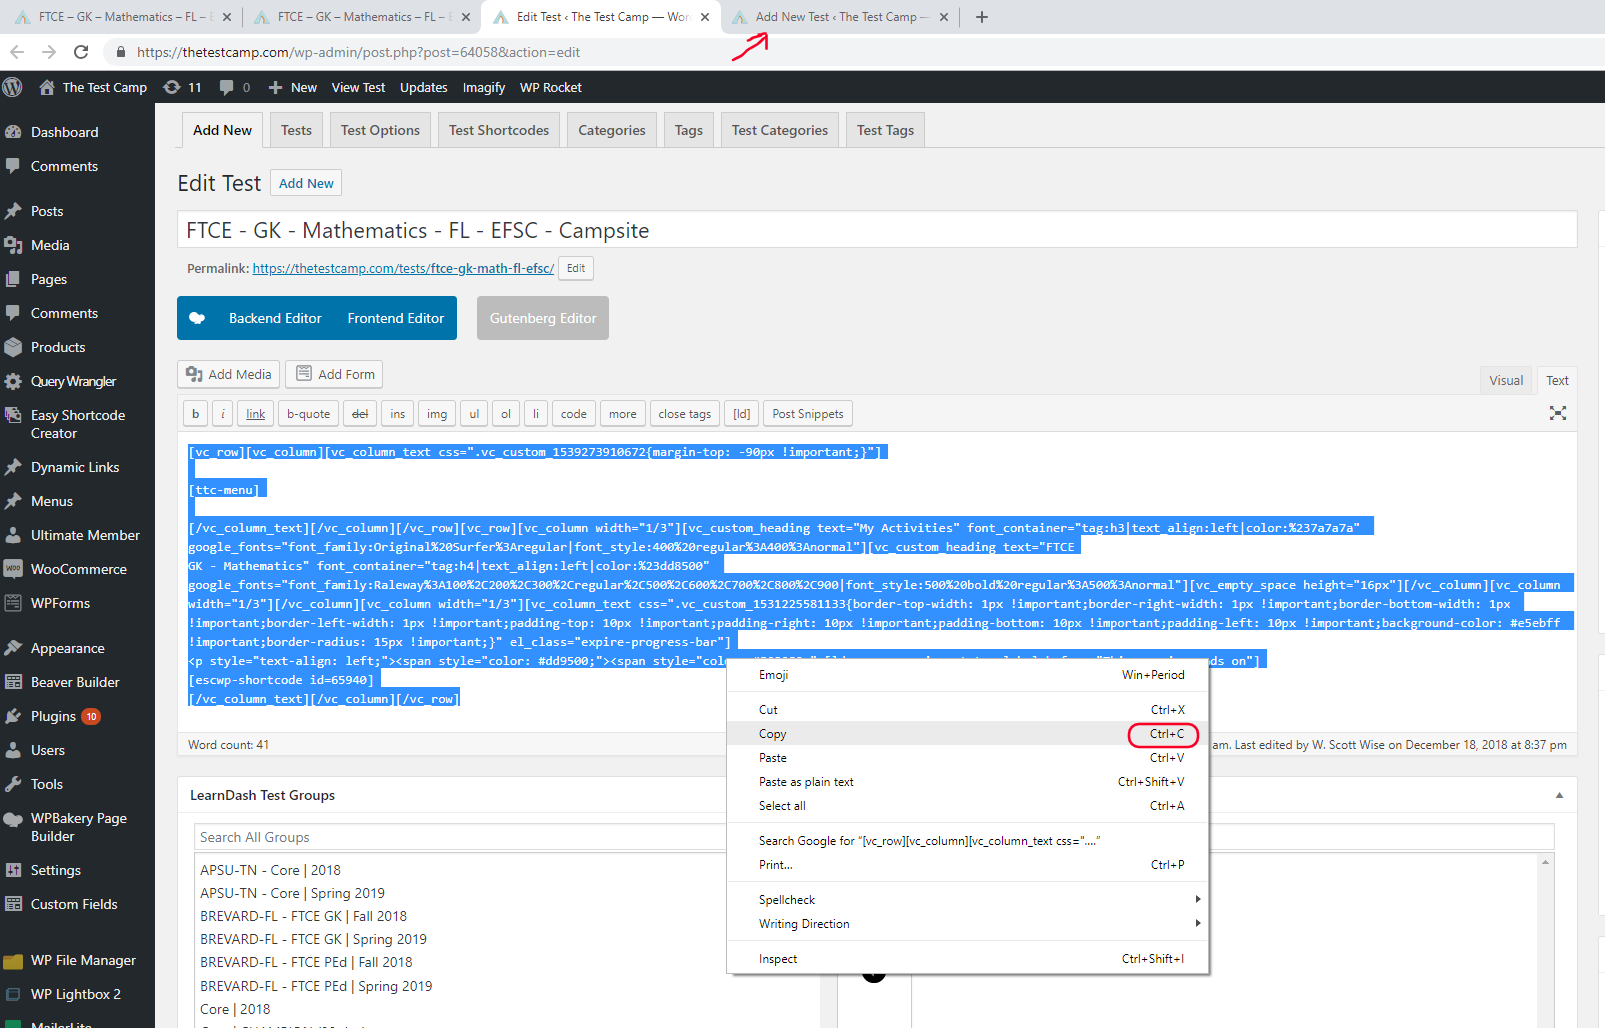
- Copy the description from the "text" source (To be pasted into the New "Demo" Test Description area)
Next back to the new DEMO Test edit page:
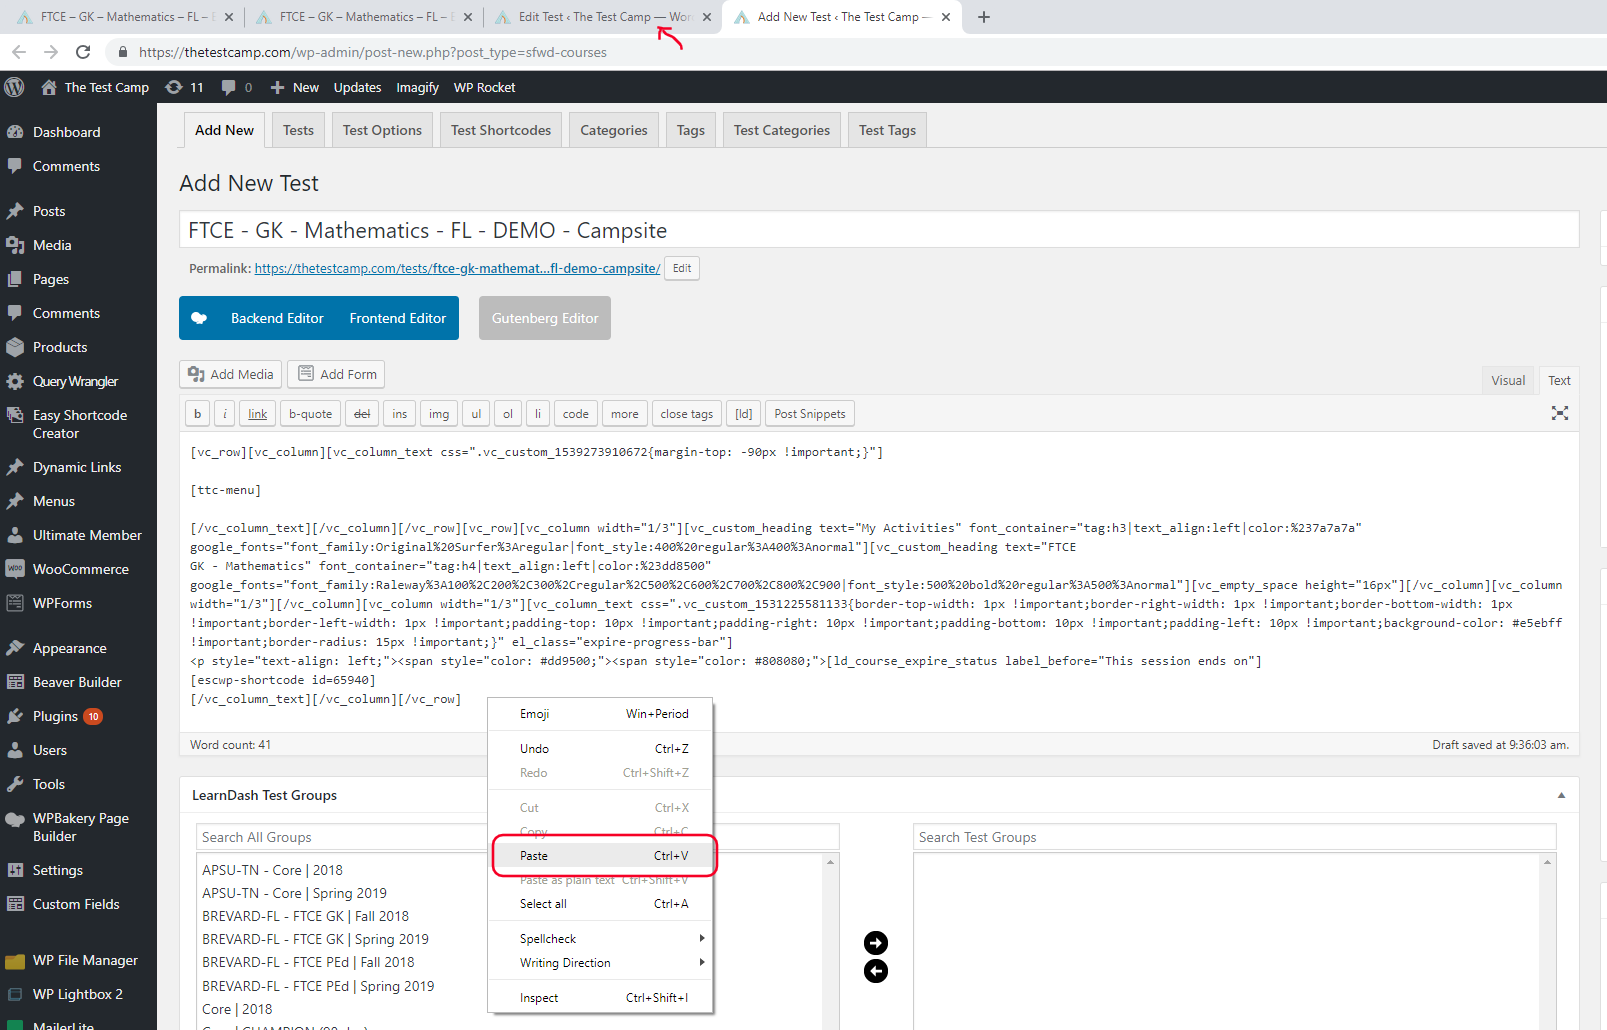
- Paste the description into larger text box (Make sure you are in "text"source view)
- No need to edit this unless a special case this data is pulled from certain shortcodes.
- Now go back to the EFSC Test edit page and get the url slug.
Back to the new DEMO Test edit page:
- Paste the url slug into "permalink" by clicking "edit" at the end of the path.
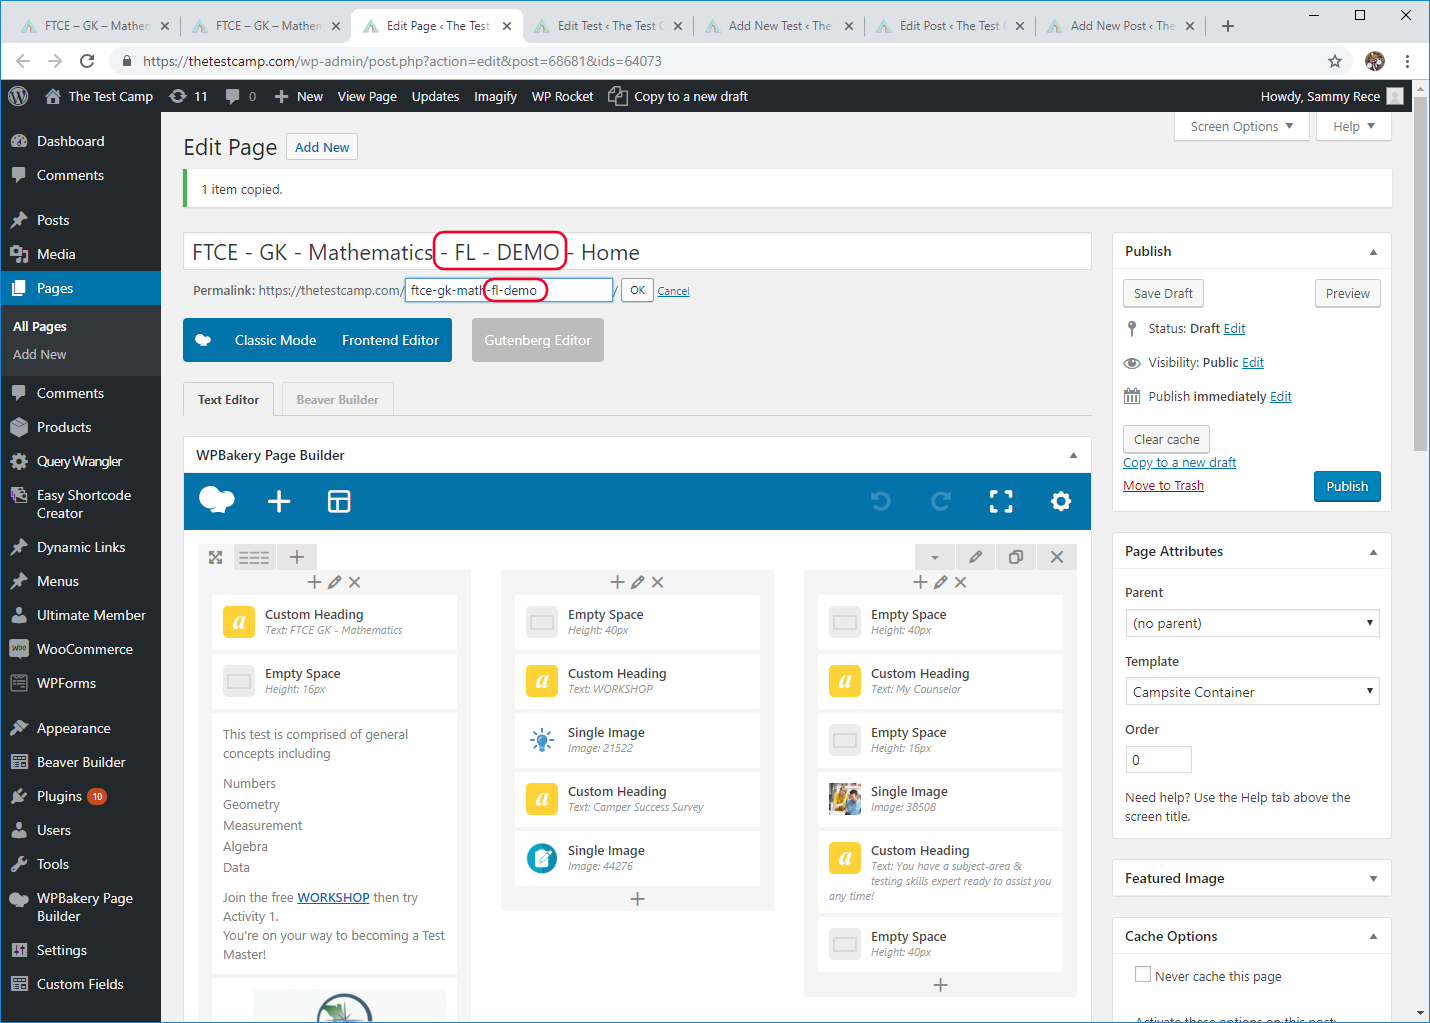
- Make sure to correct the url slug with name and state of school (in this case "-fl-demo")
SECTION 2: Create New Dynamic Menu
Before we continue editing our new Campsite we need to now create a new dynamic features menu:
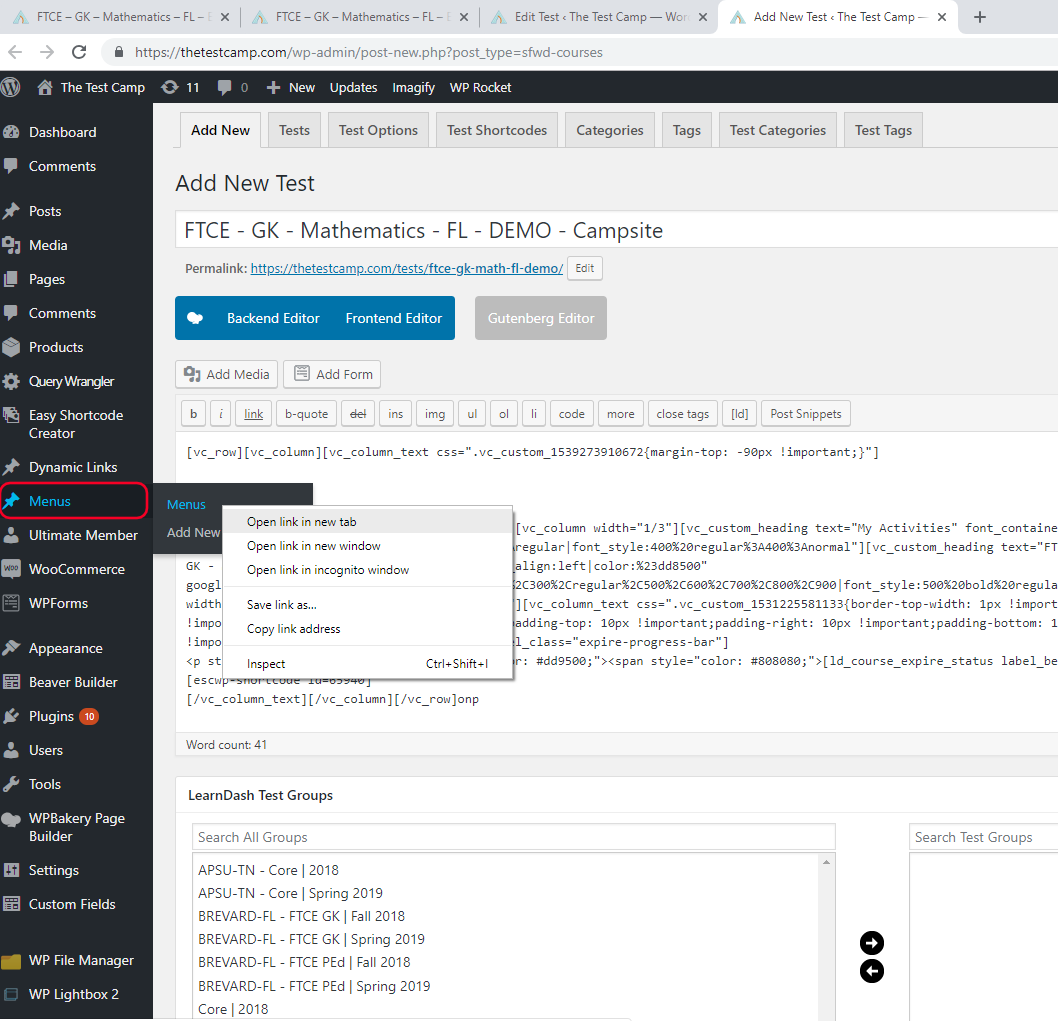
- From the Admin sidemenu open the "Menus" list in a new browser tab
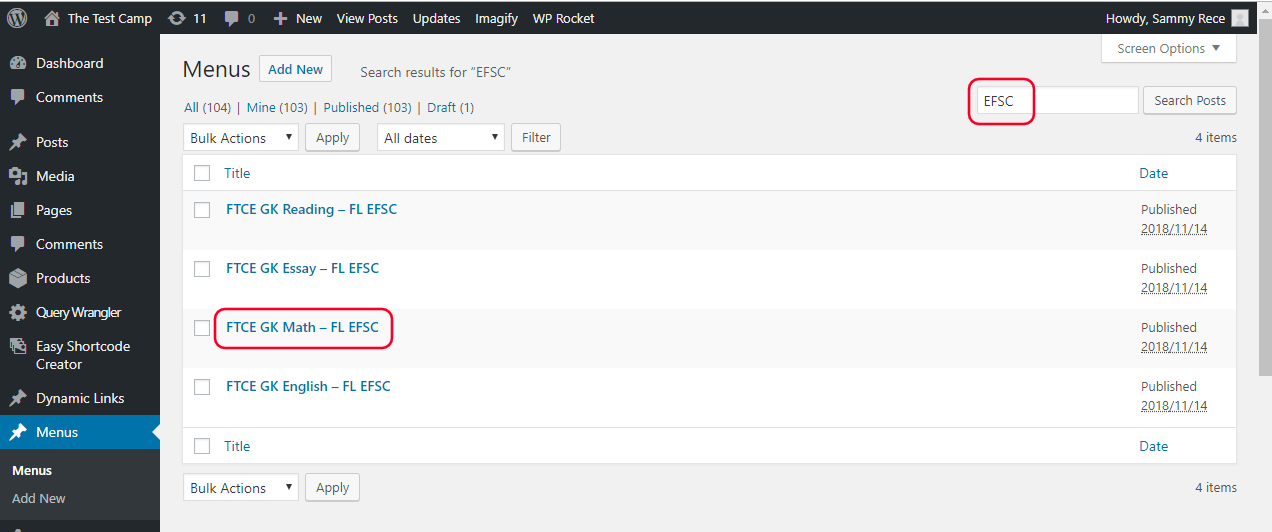
On the "Menus" list we will need to find the previously created EFSC menus:
- In the "Search Posts" field just type in EFSC (or name of school you are cloning from)
- Next just click into the FTCE GK Math EFSC menu
- All we need is the title to copy and paste into new blank menu.
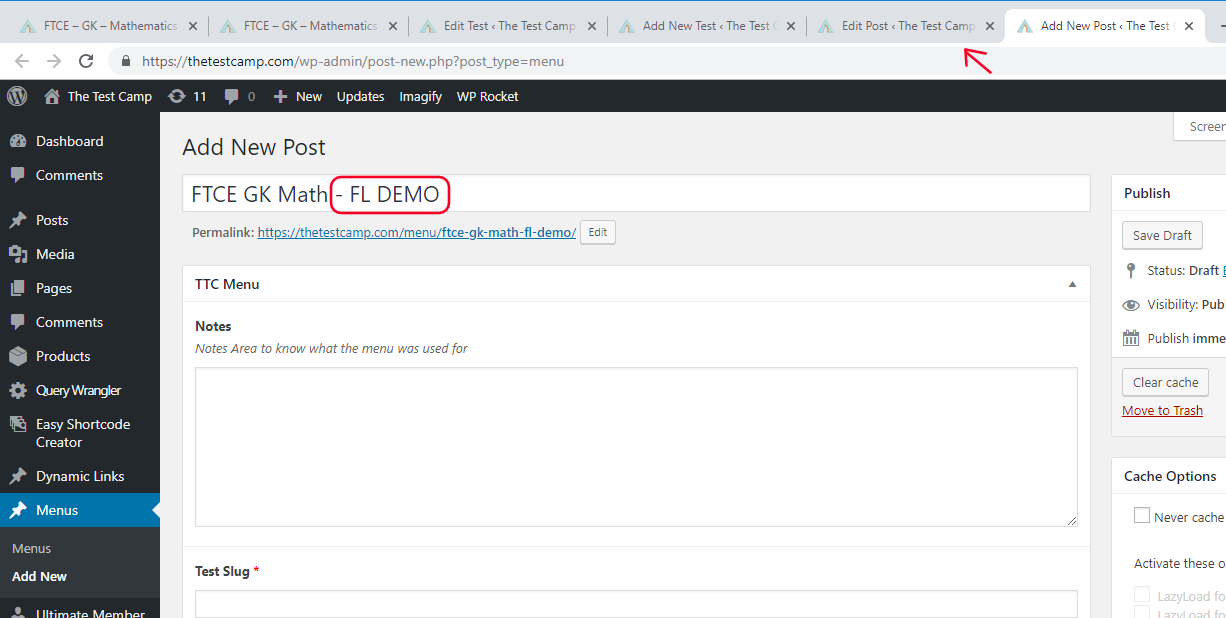
- Create new "blank" menu (in new browser tab as well) by right clicking "Add New" button
On the New "blank" menu:
- Paste the menu title into the title field and make sure to correct the name.
- Now go back to the previously opened EFSC menu to grab the main core path.
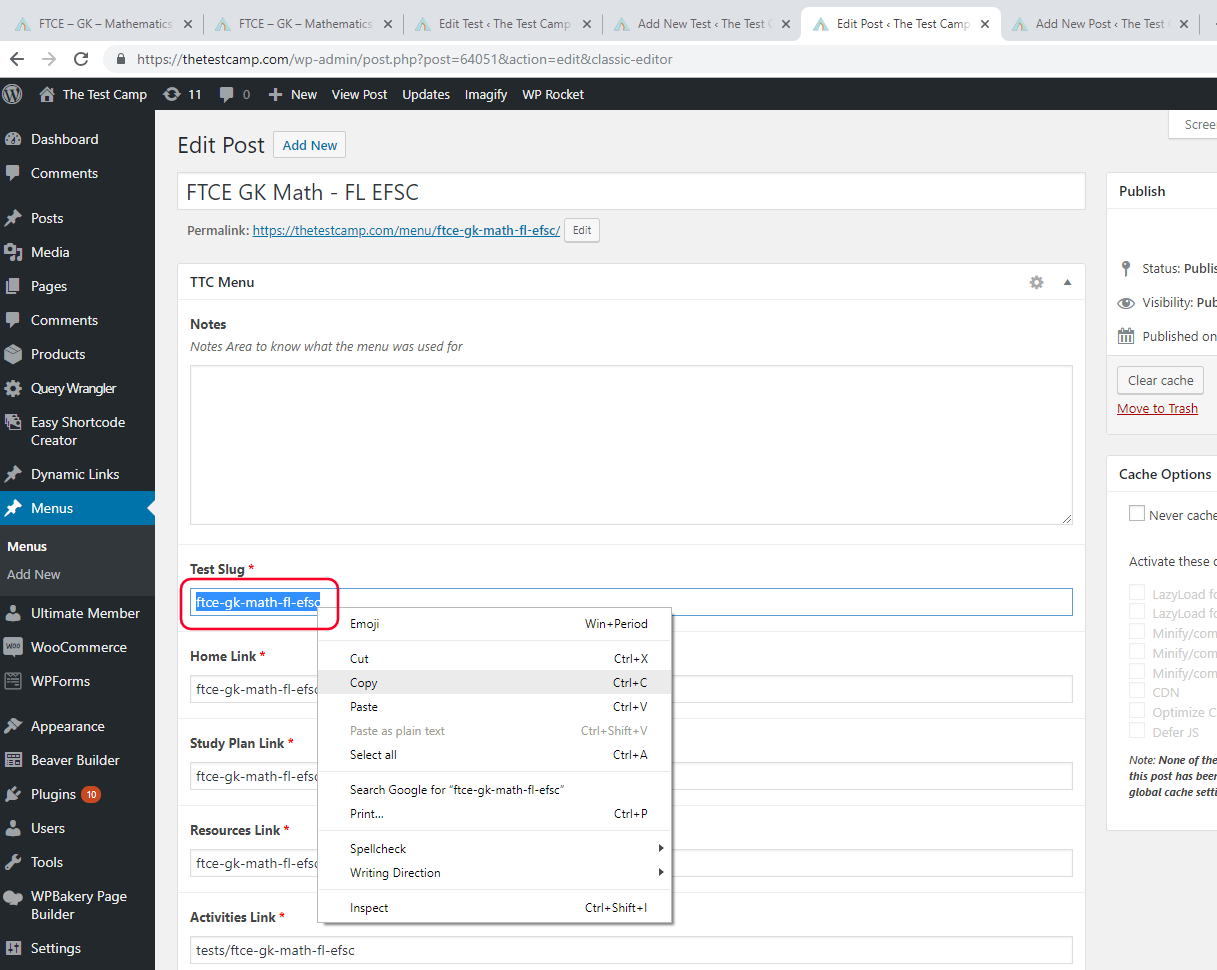
Back on the EFSC (or school) menu:
- Copy the url slug in the "Test Slug" field (in this case "ftce-gk-math-fl-efsc").
- Now go back to the new menu and paste the path.
Back on the new DEMO menu:
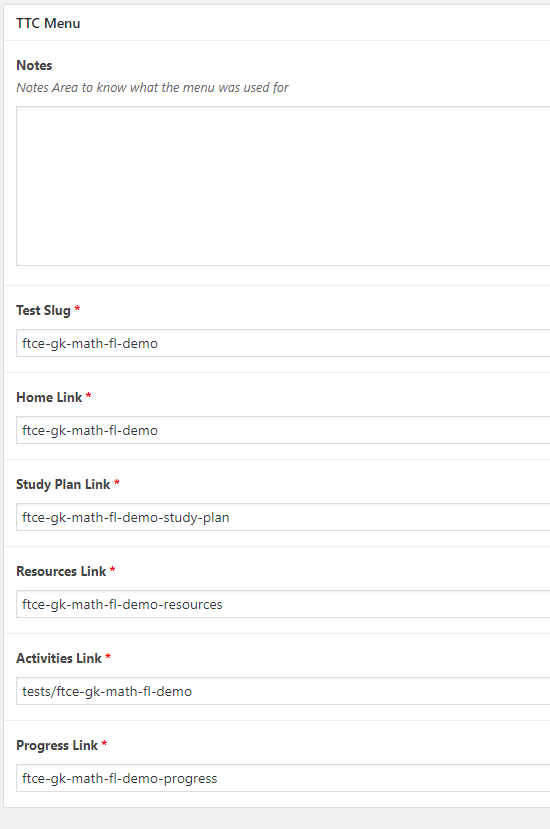
- Paste the url slug in the "Test Slug" field make sure to correct the school state and name in this case "-fl-demo".
- Next you will need to paste this same path into all "Link" fields (see below screenshot to see naming conventions for each field).
SECTION 3: Duplicate main Home Page and all Features pages
Go to the GK Math EFSC "My Campsite Home" Page:
- Make sure you are on the home page of the Campsite by using the features menu and clicking on "My Campsite Home" menu link.
- Next you will click on the "Copy to a New Draft" button on your top admin tool bar. (see image below)
On the "new draft" edit page:
- Just remove the school name (in this case "- EFSC") and replace with "- DEMO" (or name of school you are cloning for)
- Do not publish just yet.
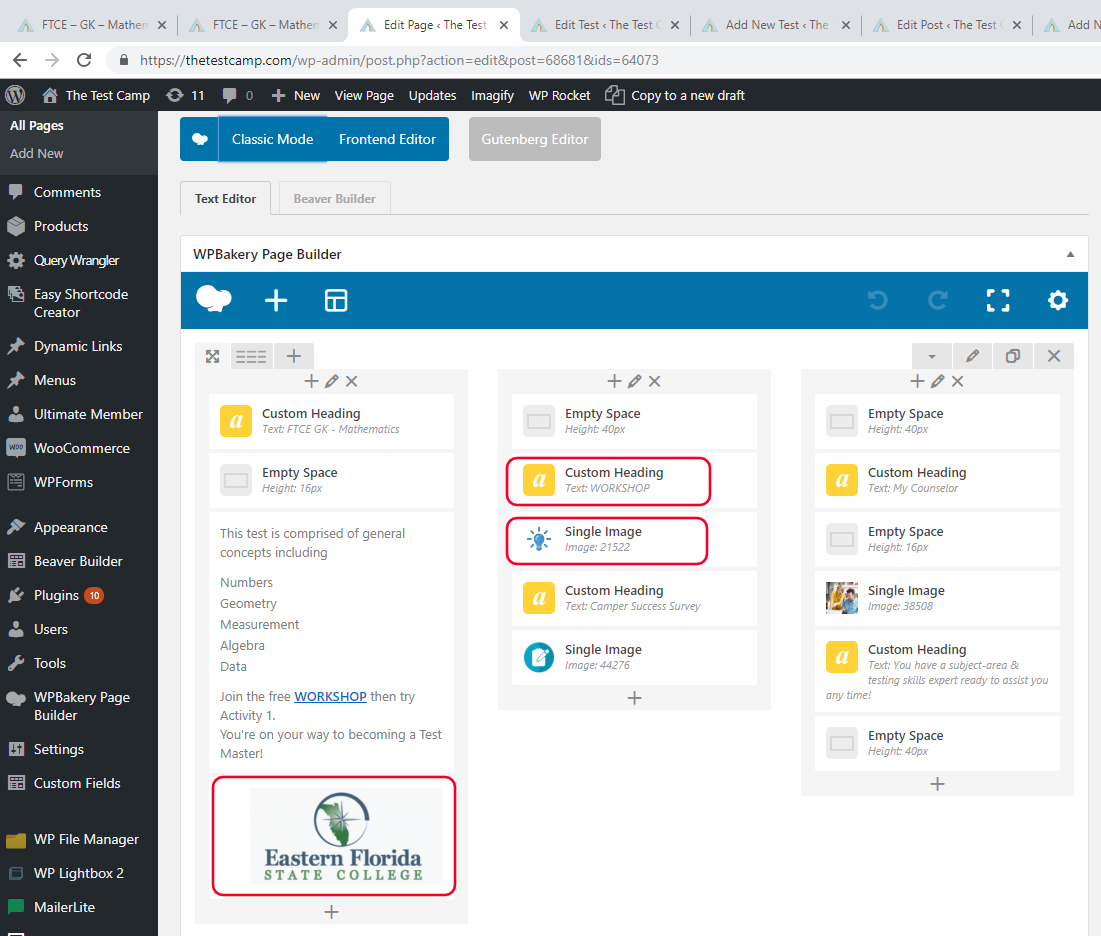
Fix "Workshop" links On the "new draft" edit page:
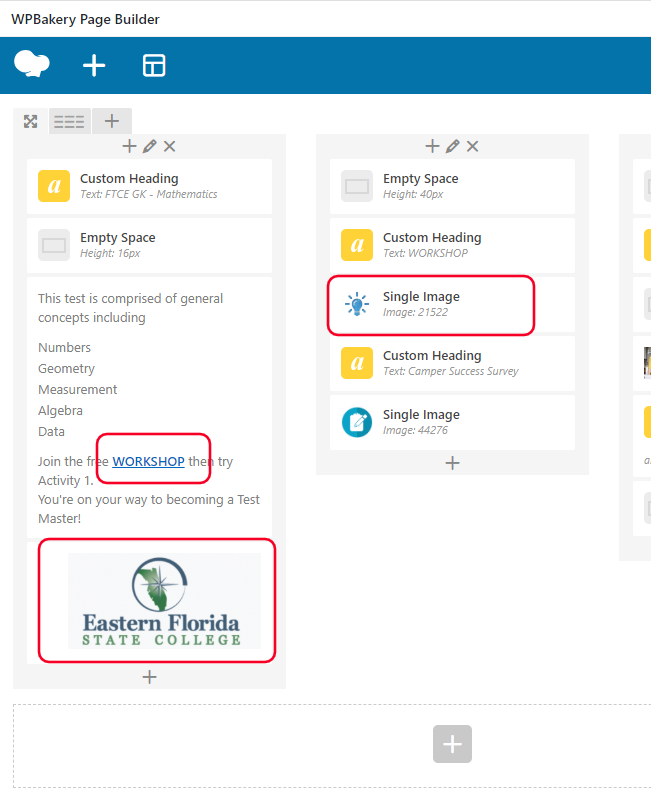
- There are 3 elements that have links to the free workshop (My Test) all of these need to be changed.
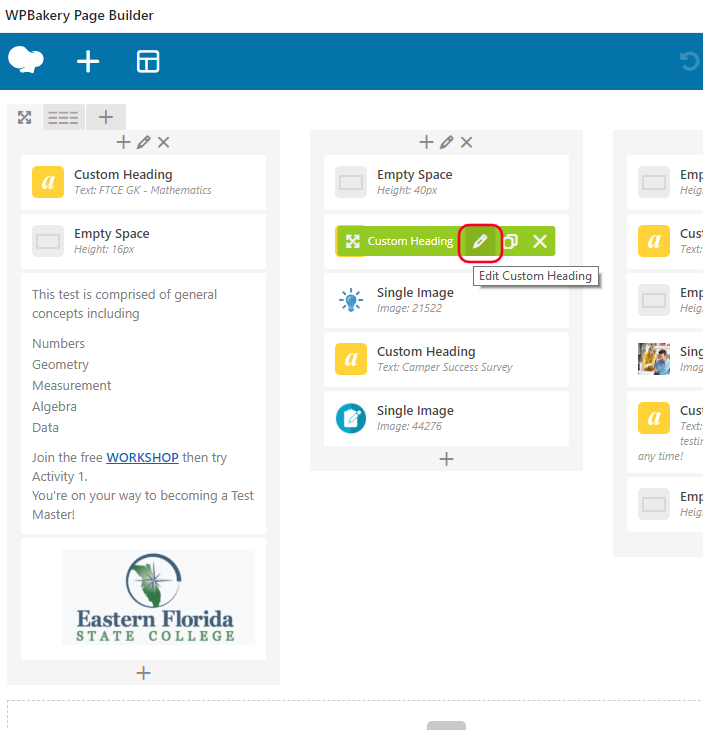
Go to WPBakery Page Builder on the "new draft" edit page:
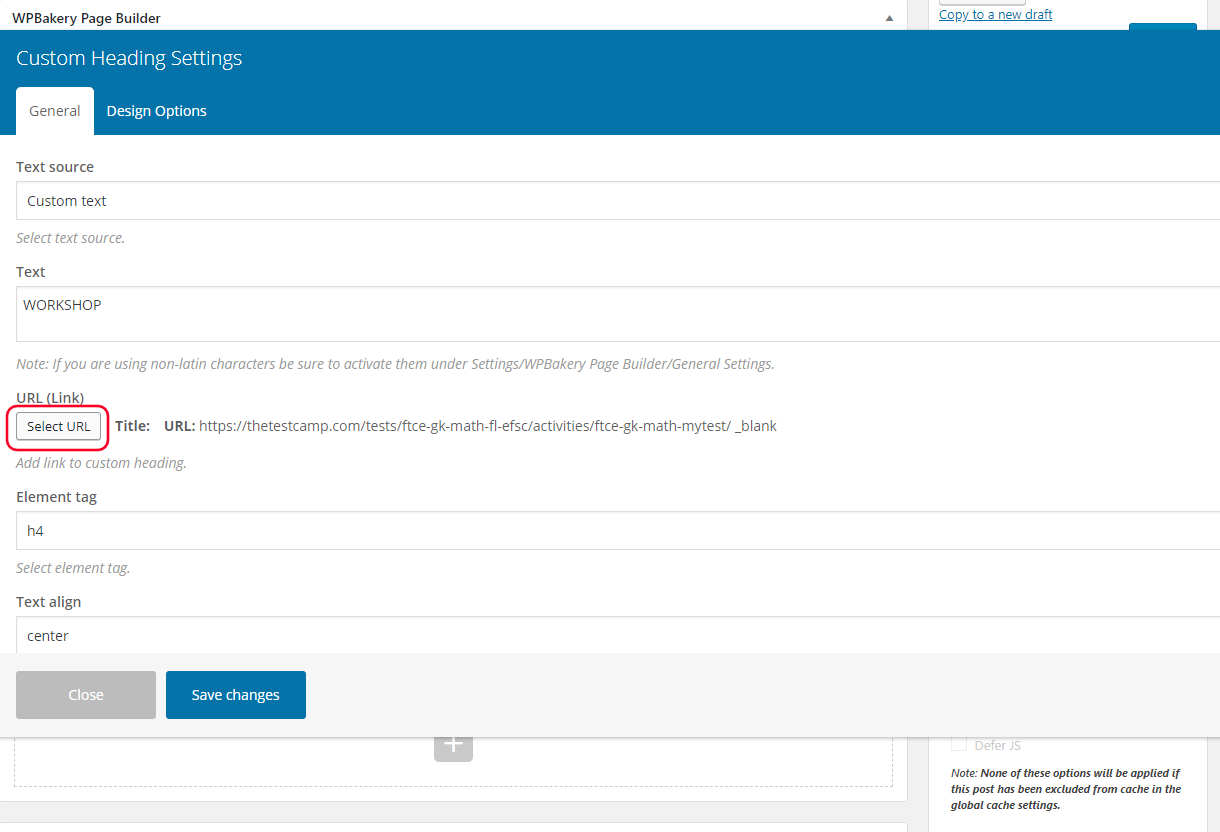
- Start with the "Custom Heading" element by hovering over the element and clicking the "edit" button which is a little pen icon (see image below).
- This will open up an edit window.
Edit URL from the edit window:
- Click "Select URL" button this will open up yet another edit window.
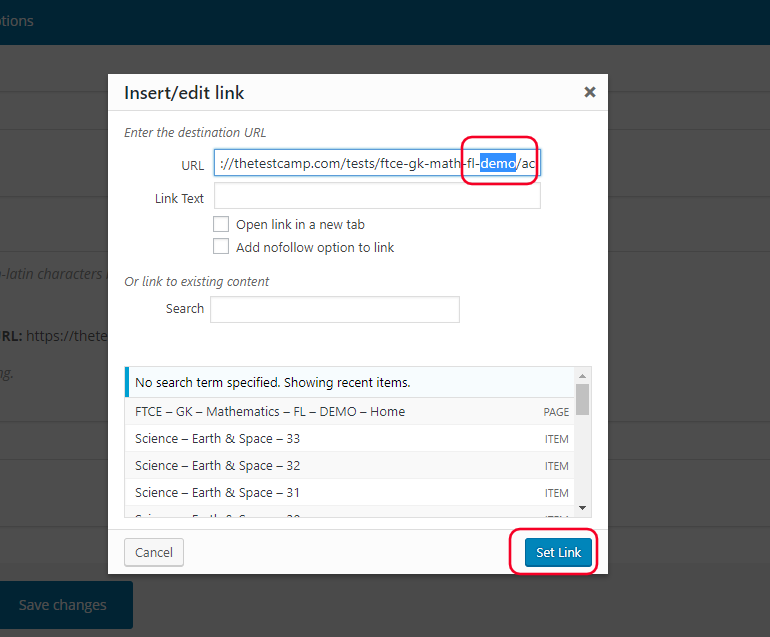
Edit URL from the "Select URL" edit window:
- Find the school name in the url path (in this case -EFSC) and change to "-demo" or "-schoolname"
- Now click "Set link" which will bring you back to Custom Heading edit window.
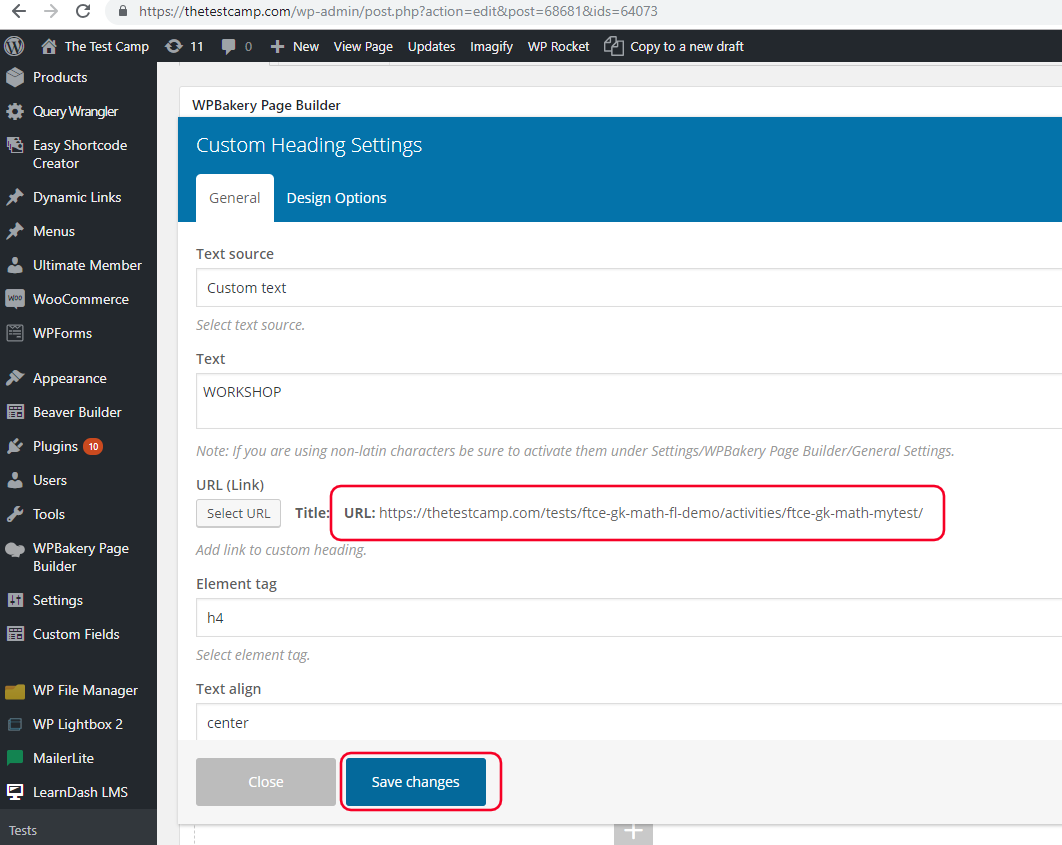
Now save the "Custom Heading":
- Check the URL make sure it set.
- Click blue "Save Changes" button at bottom of edit window to save.
Next update the other 2 elements and change the school image to new school logo image:
- Update "Single Image" and "workshop" link using same url path on last step
- Edit school logo image and change to new school logo.
- When finished updating all 3 workshop links and school logo now you can "Publish".
Go to "My Study Plan" page back on GK Math EFSC Campsite:
- Create a new copy of this page by clicking on the "Copy to New Draft" button (open a in a new tab) on the admin menu at the top.
- On the draft page in the same fashion as the "My Campsite Home" change the title and the url slug to the new school name and then "Publish".
- Do this copy to new draft method for the "My Resources" and "My Progress" pages as well (there is more to "My Progress" page copy in the next step).
On the new draft of the "My Progress" page note where the "Progress Report" shortcode will be placed:
- Will have to come back to this new "My Progress" page after you create the new "Progress Report" for school and copy the shortcode to this area (you can put it in text view to edit easier).
SECTION 4: New Test settings and Test Builder
Go back to tab with previously created new test and select settings:
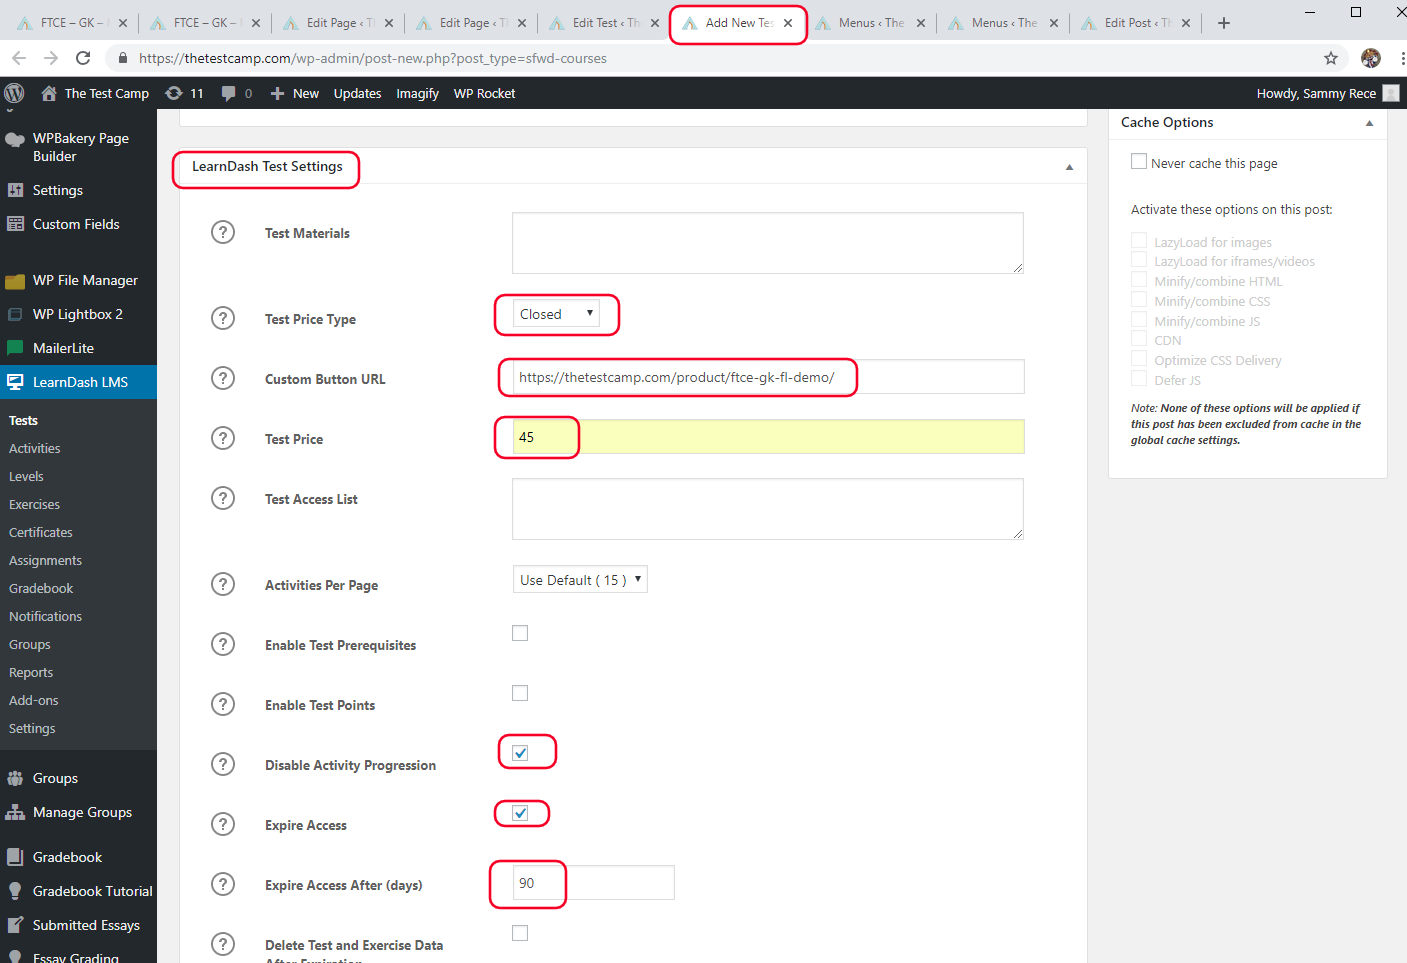
- On the new test edit page scroll down to the LearnDash Test Settings and set following settings
- Test Price Type: Closed
- Custom Button URL: set URL path to product.
- Test Price: 45
- Disable Activity Progression: check box
- Expire Access: check box
- Expire Access After (days): 90
Next scroll down to "LearnDash Test Builder":
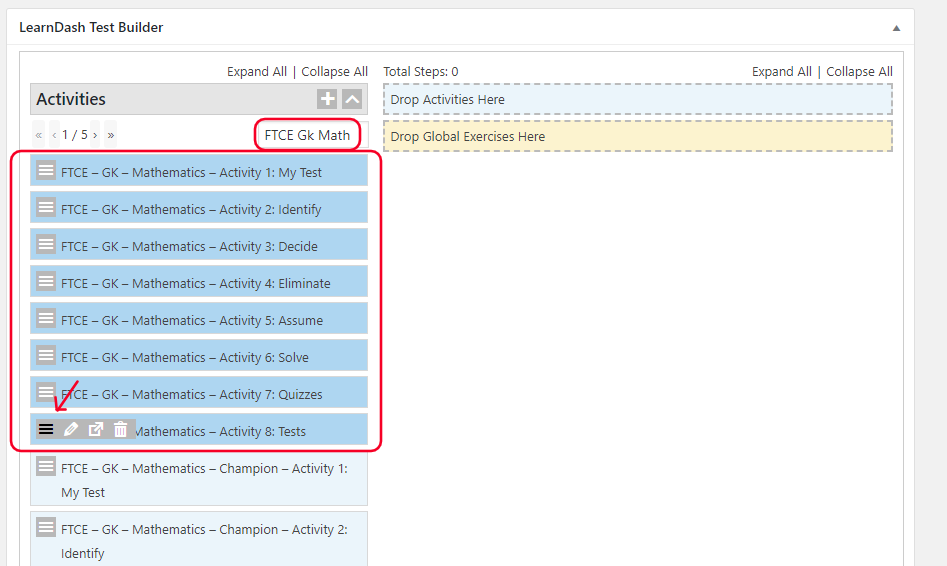
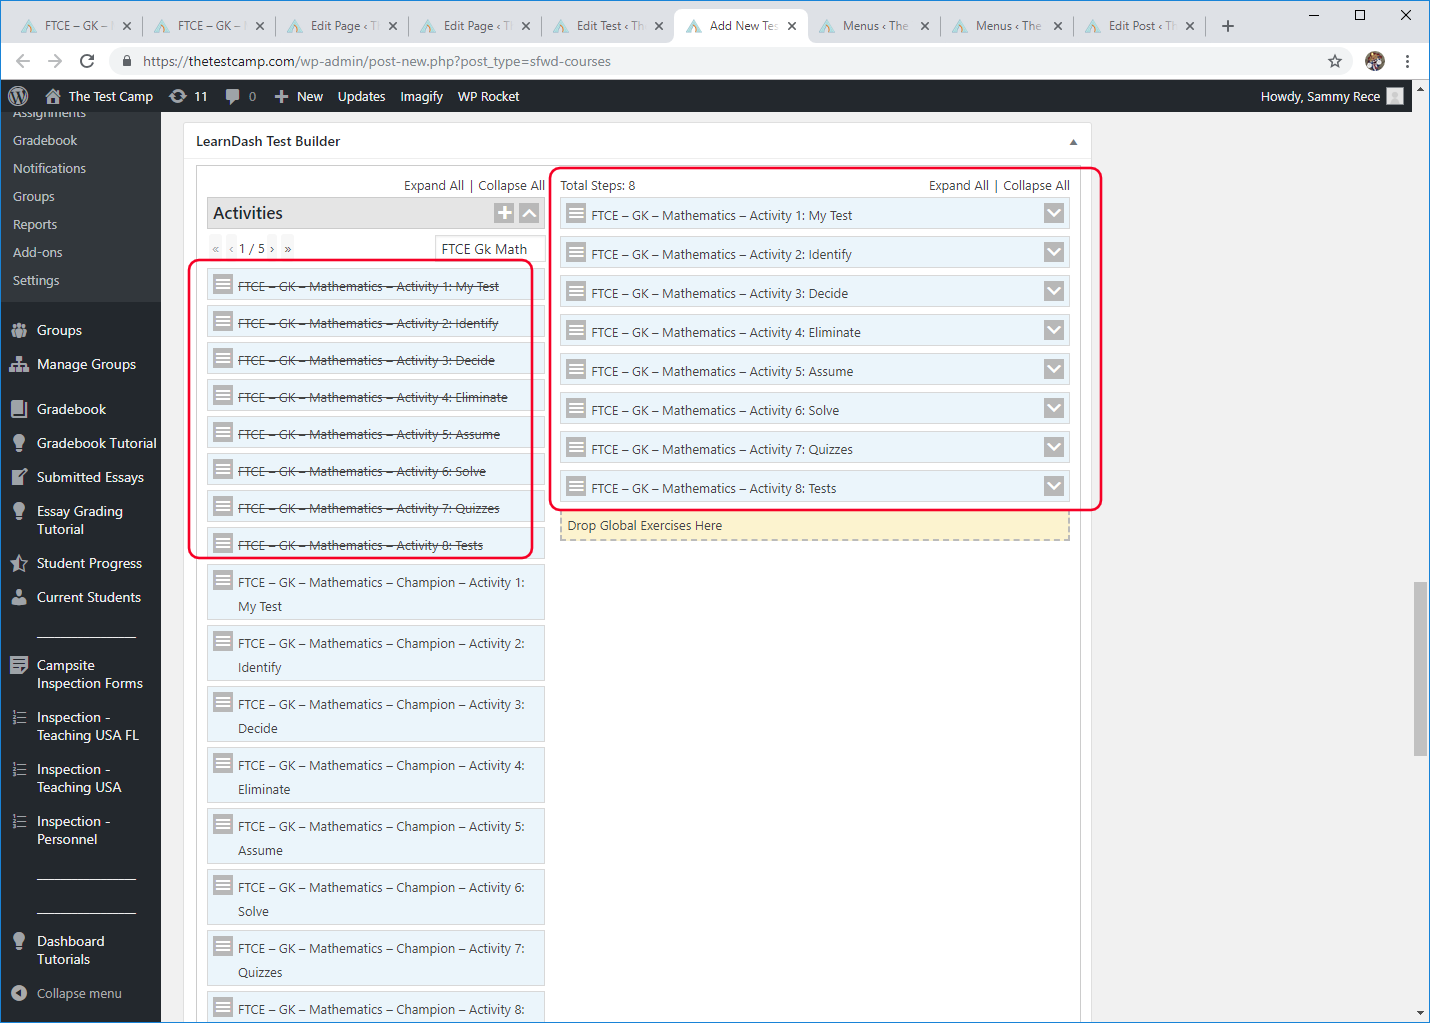
- On the "Activities" drop down on the left column type in "FTCE GK Math" (or name of activities you are looking for)
- If you typed your seach term correctly you should now see activities 1-8 for GK Math
- Select each activity individually by simply clicking once on the icon that has 3 little lines (see image below) do this for each activity.
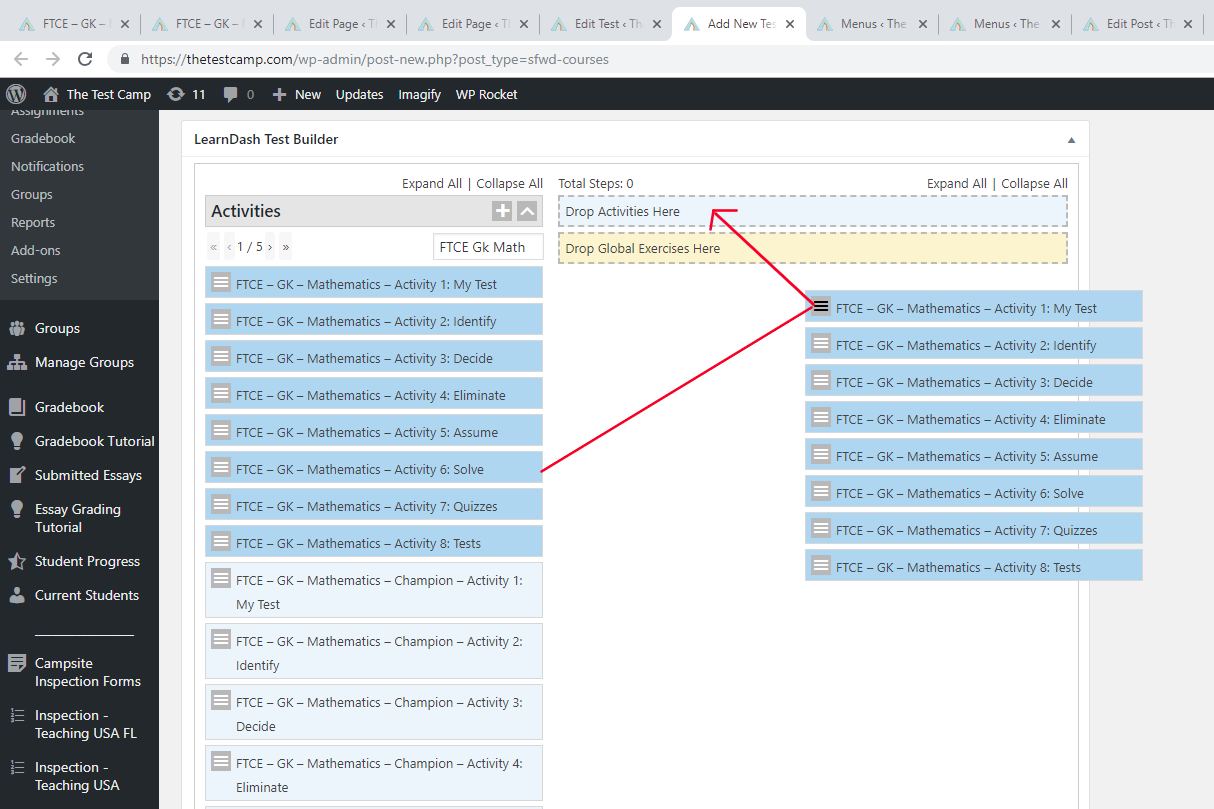
Now you can drag and drop the selected activities over to the right column where it says "Drop Activities Here"
- After you move the activities over to the right column check to see if they are in the correct order.
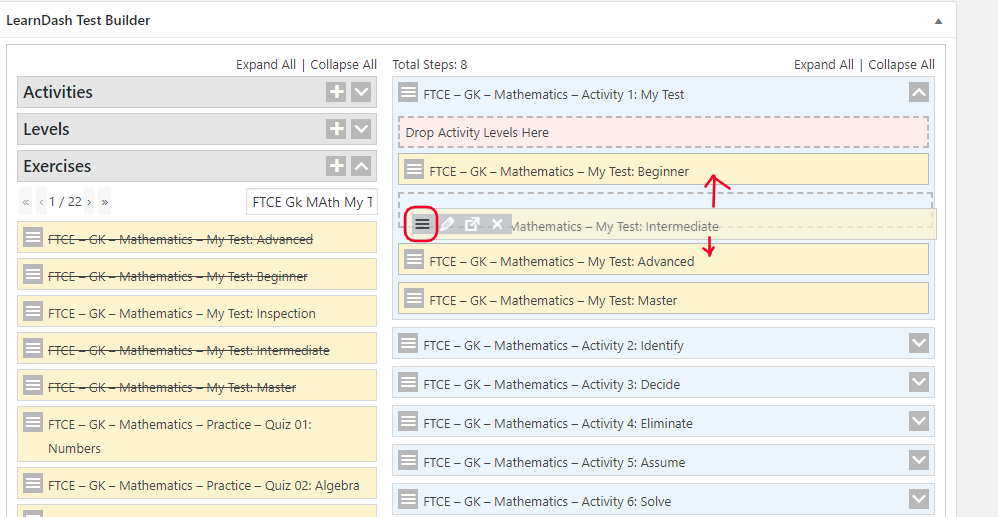
- If activities are out of order you can simply move individual ones up and down by clicking and holding the 3 line icon.
You will notice the activities on the list to the right will now be crossed out with a line, this just shows these are the activities you are currently useing for this test (Campsite).
Next go to the Exercises list:
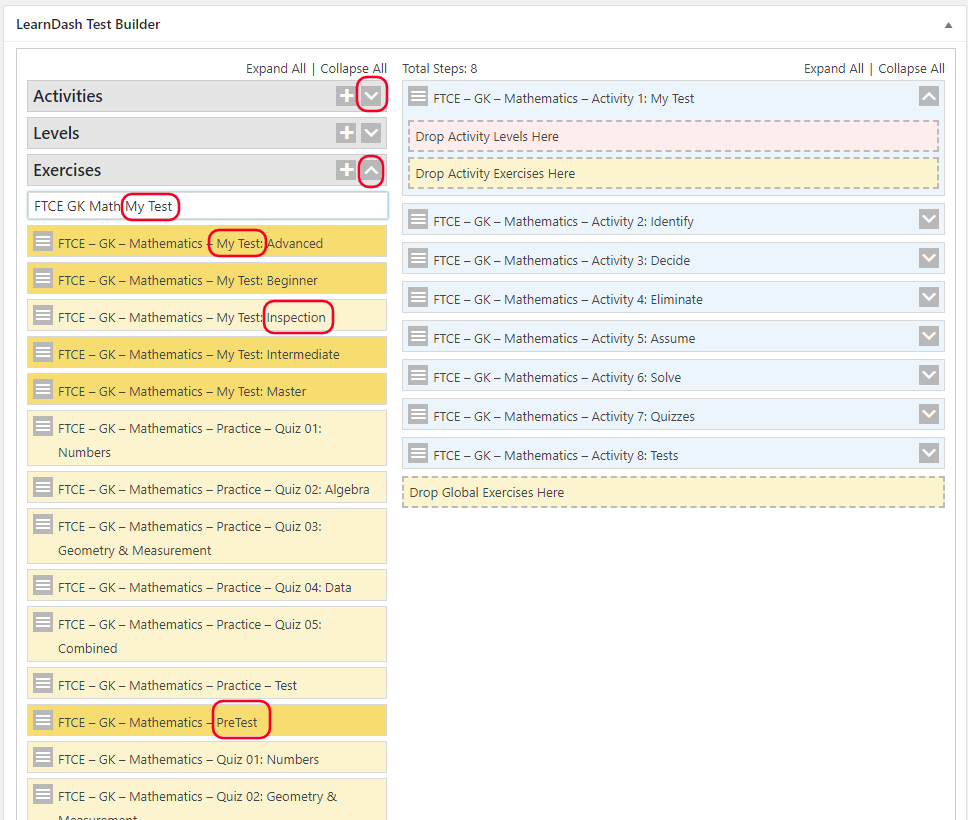
- On the left column of the Test Builder you can click the arrow icon by Activities to minimize that list.
- Now expand the Exercises list by clicking on the arrow (see image below)
- This time you are going to type your search with the name of the Campsite and the activity name (start with "My Test")
- This will give you Exercises for the "My Test" (Notice: Some of these could be 'inspection' exercises and/or 'practice' DO NOT SELECT THESE)
- Also, look for the exercise called "PreTest" because now we are adding the Pretests to the My Test areas of all new Campsites.
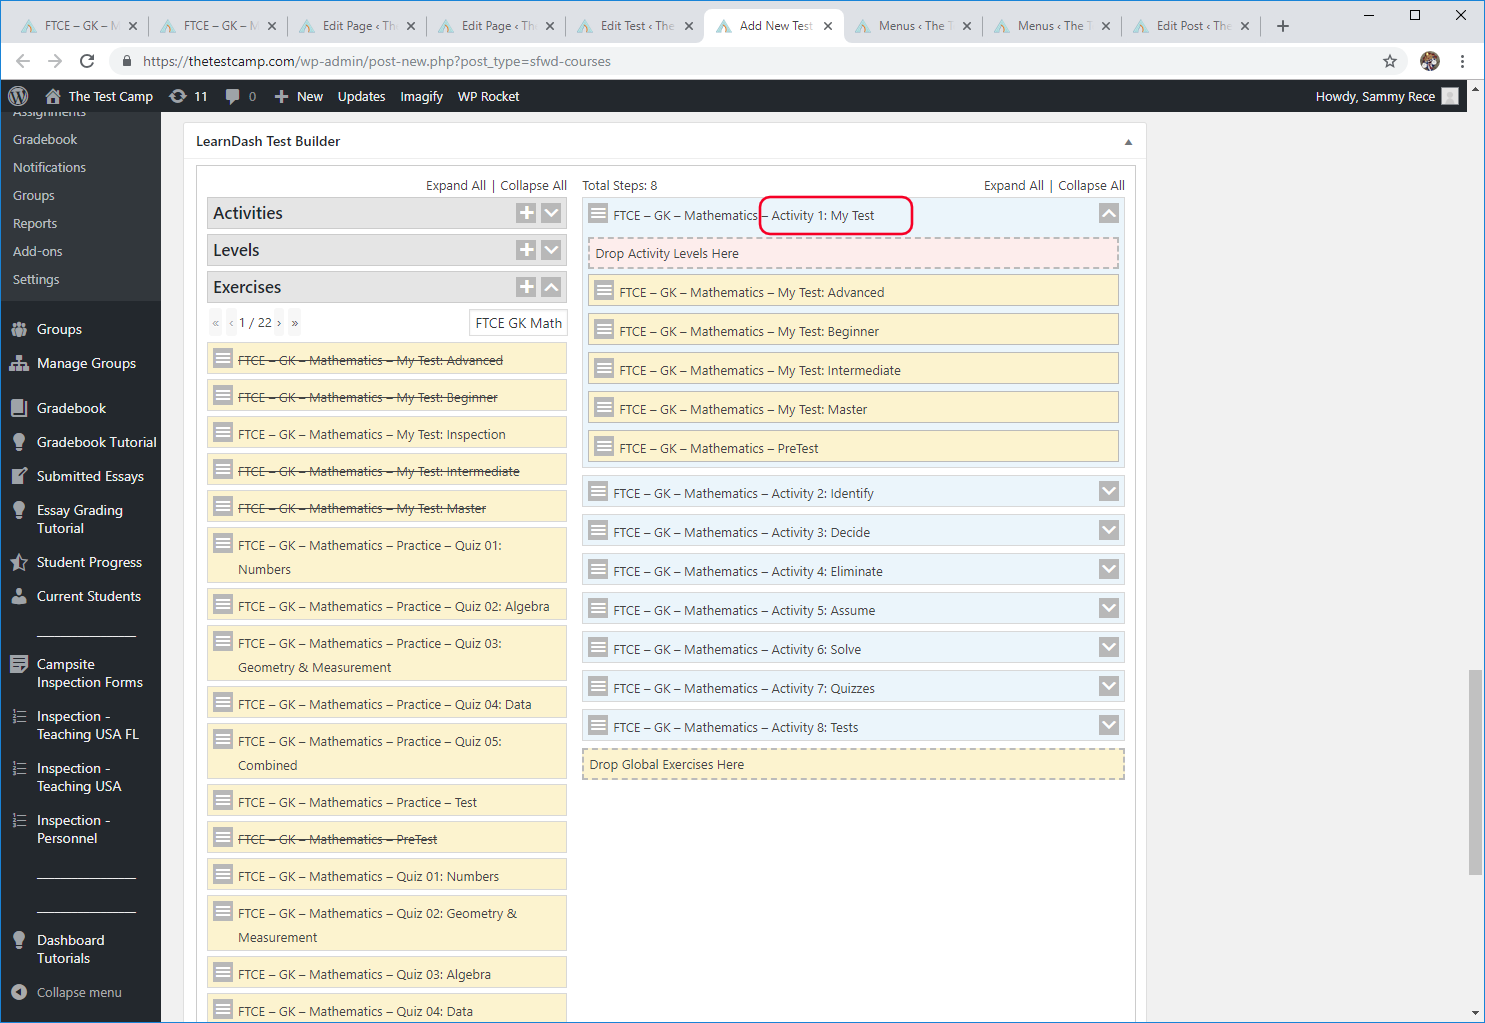
- Before dragging over these My Test exercises to the right column make sure to expand the My Test activity on the Right hand column by clicking on the down arrow next to the My Test activity.
Check and Fix order of My Test exercises if they are out of order (See next 2 images below)
Find and drag over all IDEAS Exercises:
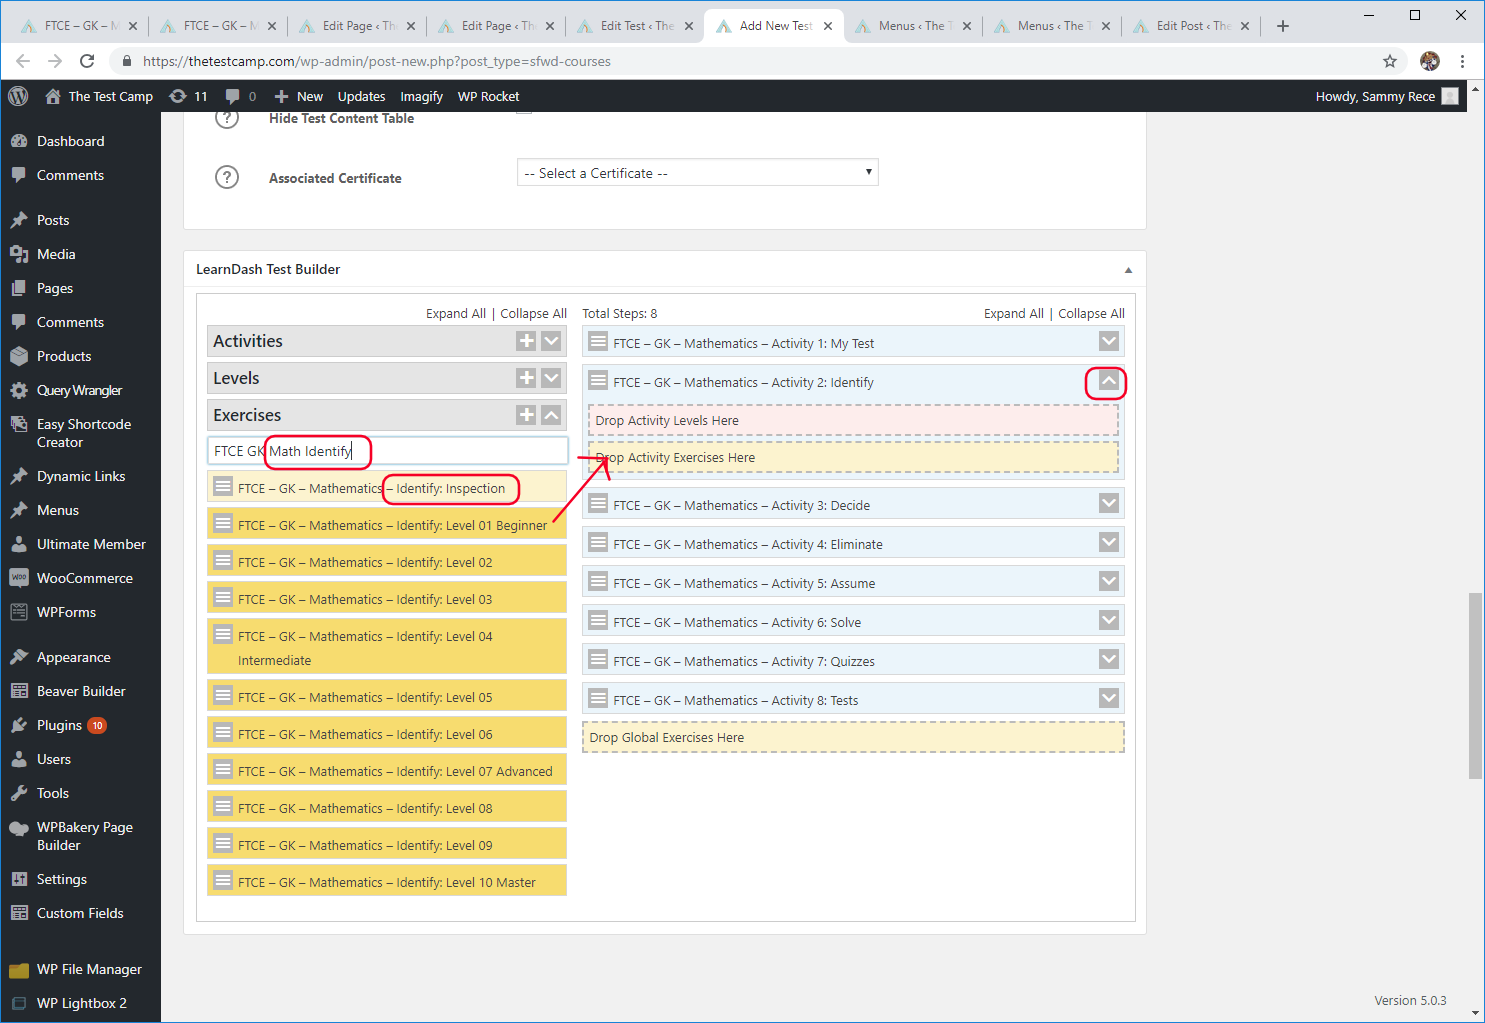
- The same way you searched for MY Test Exercises use that method to find exercises for each individual activity (In this case search term would be "FTCE GK Math Identify")
- Remember not to select the inspection or practice exercises.
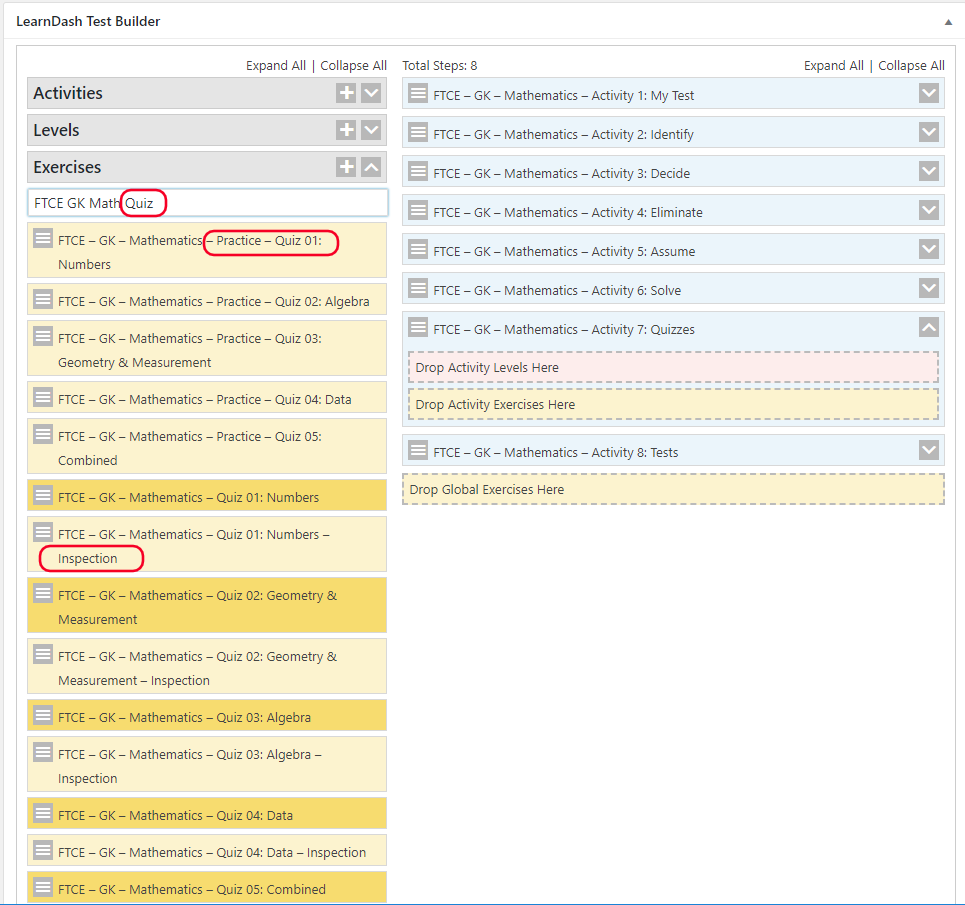
Find and drag over all Quizzes and Test(s) Exercises:
- The same way you searched for IDEAS Exercises use that method to find exercises for quizzes and test(s)
- When you are finished moving all activities and exercises go ahead and publish this Test(Campsite)
SECTION 5: Create Progress Report
Find "Progress Report":
- Located on the "LearnDash LMS" Menu within your admin dashboard menu
Search for an existing school gradebooks that you want to source from:
- Type the school name in the search field on top right of list (in this case use "EFSC") then click "Search Progress Reports".
- This will bring up a list of all previously created gradebooks for this school.
- Choose one and go into the edit page for that gradebook.
Grab info from existing gradebook:
- First copy the title of the gradebook to be copied to new gradebook you are about to create.
- Next do a right click and open "Add New" in a new tab (this way you can refer back to this gradebook later)
Paste title in new gradebook:
- After you paste the title change the out the school name (in this case "DEMO").
- Then find the first section called "Grading" and under "Course" search for your school name (in this case "DEMO")
- This will now show a list of all tests (Campsites) that have the schools name you typed in.
- from the list select the Math test.
Add one component:
- Add a component by clicking the blue "Add Component" button.
Name first component "Pretest":
- click in Name field and type Pretest.
- Now go ahead and Publish gradebook by clicking the blue "Publish" button on right side.
From "Pretest" component:
- Click in "Lessons" field and a list of Activities (You previously created with the Test Builder) will drop down.
- Select My Test activity.
Add "Pretest" exercise to component:
- Click in "Quizzes" field (below where you selected the lesson) and a list of exercises (quizzes) will drop down.
- Select PreTest exercise.
- Then add another component.
Name new component "My Test":
- Using same method as pretest select lesson and then exercises (quizzes).
- Add all "My Test" exercises to this component.
- You will have to select them one at a time from the list (See next 2 screenshots to see what it should look like after all exercises added for My Test)
Add all IDEAS components:
- Using same method as My Test select lesson and then exercises (quizzes).
- You will have to select them one at a time from the list (See next 2 screenshots to see what it should look like after all exercises added for Identify example)
Add all Quizzes and Test(s) as individual components:
- Each quiz will be a seperate component so name quiz components like this: Quiz01: Numbers, Quiz02: Algebra etc....
- If more than one main test name like this: Test01, Test 02 etc.. (See next 2 screenshots for examples)
SECTION 6: Progress Report and Progress Page Shortcode
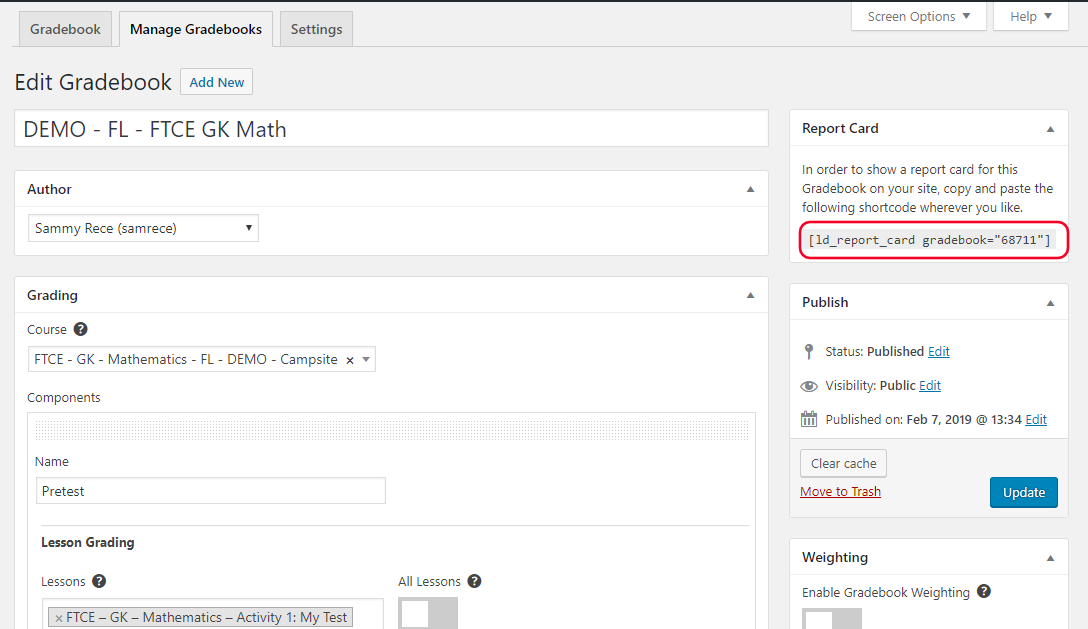
Copy "shortcode" from gradebook you just created:
- On the far rightside you will see a white block that says "Progress Report" copy this shortcode to be pasted into the progress page of the corresponding Campsite.
Paste "shortcode" into Progress page element:
- Since we made a copy of the original Progress page for the new school the shortcode element for the Progress Report should already be there as a WPBakery element.
- Edit this element and paste the shortcode over the current one so that it displays the new schools gradebook and not the one you copied from.
- You are finished! This step will complete a full clone of a Campsite.
